This is a classic scenario: Joe S. Rodder takes his budget roadster down to the local wiring guy to have a new wiring harness installed, and the quote is for 40 hours of labor! After catching his breath, all our pal Joe can think is, what could possibly take so long? The truth is that nice wiring jobs, the kind that help a car run all day and look good sitting still, take time.
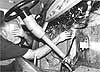
Even if Joe started with one of the fine kits on the market today, such as the Painless Wiring kit shown here, he would find that the job takes at least 40 hours. It takes a lot of work to install a wiring harness, work that most people never see. Details like where the fuse block is placed in the car, how it's mounted, how the wires are run, how the connectors are installed and more all contribute to how the final product looks and works. To learn all this and more, we went to Fred's Wiring in Ontario, California, where Fred Ingle and his crew tore into wiring one nameless yet rusty roadster.
YOU WANT A QUALITY WIRING JOB
While most of the wiring is covered by upholstery or panels, the cleaner it's laid out, the less chance there is of problems showing up later. Even if problems do appear, the chances of finding them are better with a clean installation.
Electrical gremlins are probably one of the most frustrating automotive problems, so the time spent wiring your car correctly will keep you on the road, instead of on the side of the road with a flashlight in your hand.
Most rodders struggle with where to start wiring a car. If you've never wired a car, it is hard to picture where to place the fuse block. Usually, the best place is under the dash on the firewall. This makes the fuse block easily accessible and simplifies running the wires to the rest of the car. Velcro, fasteners and welded-on brackets are commonly used to mount the fuse block, but Fred's used fiberglass-reinforced epoxy to glue a fuse-block bracket to the firewall. This eliminates any unsightly holes or welding damage, yet provides a permanent mount for the block.
Once the fuse block is mounted, running the wires to their respective areas is the next task. The Painless Wiring kit comes with the wires prebundled, but Fred's recommended using bundles of eight wires or less, so some of the bundles were redone to reduce the number of wires.
The wires were located in the car to minimize their exposure to extreme heat and wear, both of which could cause a short. Fred's also used small adhesive-backed wire anchors for holding wires to vertical surfaces. The adhesive was scraped off and epoxy was used to mount the anchors permanently. These pieces are available at electrical supply houses for less than a dollar each. As the wiring was placed in the car, zip ties were used every few inches to hold the wires neatly together. Fred's used a zip-tie gun to get even tension and clean cuts on all the ties. The gun is a $25 tool that will get a lot of use once you realize how nice the results look with wire ties.
All the wiring bundles were run through the car to their proper locations before any cutting and crimping started. This was because it was inevitable that some wires would have to be rerouted around obstacles that arose during the job. Always make sure everything is in its place before cutting, since this will prevent the dreaded splicing of wire later.
After all the bundles were positioned, the wires were cut to length and the Painless Wiring—provided solderless ends crimped on. Having a quality crimping tool makes all the difference when putting solderless ends on wire. If you have el cheapo clamshell-jawed crimping pliers, toss them and spend $25 to get the proper half-moon-and-cleat crimping pliers shown here. The wire strippers you see here cost another $25, but like all good tools, once you spend the bucks and use them, you'll never think about the cost again.
For a superclean look, use shrinktubing over the connector and wire mating point. Fred's used solderless connectors without the plastic cover, so all the ends have shrinktubing on them, but it works just as well on the plastic- covered ends.
Finally, a test light is critical to fine-tune the entire system after you think you have finished. Electricity is quite simple: It flows from positive to negative, leaks at the point of least resistance (a short) and makes nice stuff look and smell bad when it shorts. Therefore, you need to work smarter than electricity (which shouldn't be that hard) and make your wiring system as clean and efficient as possible to avoid these problems. All that takes is time and knowledge, both of which you now have!