Toilets aren’t the most glamorous or exciting things to talk about, but they are a necessity, and odds are pretty good your RV has one. RV toilets are different from what you would find in a typical sticks-and-bricks residence. Residential toilets have a reservoir tank filled with water that dumps into the bowl to flush the waste, then slowly refills the tank. While the tank is refilling, a small amount of water is added to the bowl, which seals off the trap and prevents sewer gases from filtering into your home. That works fine when you have an unlimited water supply and a sewer or septic tank to carry away the large volume of waste water. However, RVs have a limited fresh water supply and only so much holding tank space for waste water. As a result, RV toilets are designed differently.
They are all pretty much similar in basic design, although RV toilets may vary in features. Some use levers and have electric-flush mechanisms, while some use foot pedals and mechanical flush mechanisms. With the exception of macerator-style toilets, which actually pump the waste to a distant tank, an RV toilet generally drops its waste straight down into a black-water holding tank. Access to the tank is provided via some sort of ball or blade valve that opens and closes. This valve has a rubber seal to help keep a small amount of water in the bowl, and prevent those nasty fumes from entering the RV’s interior.
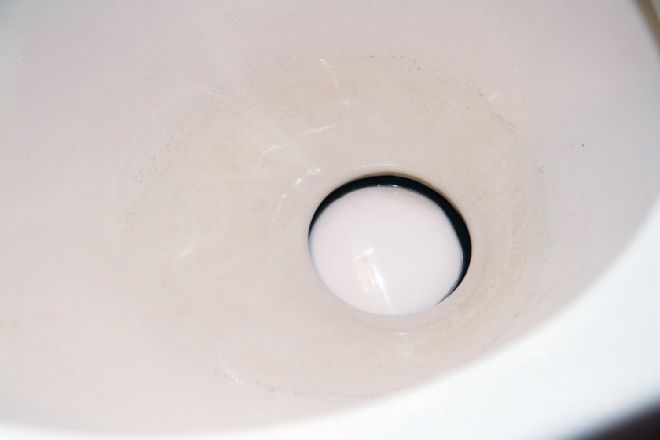
| 01: RV toilets need to be able to hold a pool of water in the basin to prevent odors from entering the interior of the RV. This seal was leaking and failed to hold water.
Unfortunately, this design isn’t flawless, and it’s common for water to leak out of the bowl, making for a stinky RV. If the seal is dirty, it may be possible to clean it, depending on the severity of the problem and the age of the seal. Once cleaned, it might be able to hold water in the bowl again. But if the seal is aged, torn, or dried out, you need to replace it.
Our particular motorhome was equipped with a Sealand Concerto toilet. This unit was once again not holding water and the last cleaning failed to restore it to proper operation. I decided it was time to replace the seal, ordered a replacement seal kit, and set about tackling this glamorous project.
First, I had to remove the toilet to gain access to the flush mechanism beneath the bowl. The toilet was fastened to the floor by two long hex head screws. I then removed the top cover that affords access to the controls, which was easy because it was held in place by Velcro fastening strips. I shut off the water pump and bled the pressure out of the water supply line to minimize any mess. I flushed the toilet several times to empty all the water out of the system and disconnected the H2O supply line. Finally, the toilet lifted right out of its waste line socket and I carried it out of the RV and set it on an old blanket pad to work on it.
I inverted the bowl on the blanket to allow access to the flush mechanism beneath it. The entire mechanism was held in place by three L-shaped bolts that passed through mounting lugs in the china bowl. Stainless steel nuts and flat washers passed through the mounting slots in the flush mechanism to hold it to the bowl. I loosened these nuts, swung the bolts out of the way, and was able to lift the mechanism off the bowl. Once the flush mechanism was removed, I thoroughly cleaned the recirculating ball valve and greased the linkage as needed. I removed the seal rings from the base of the bowl, being careful to arrange them in an orderly manner so the new rings could be installed in the same fashion.
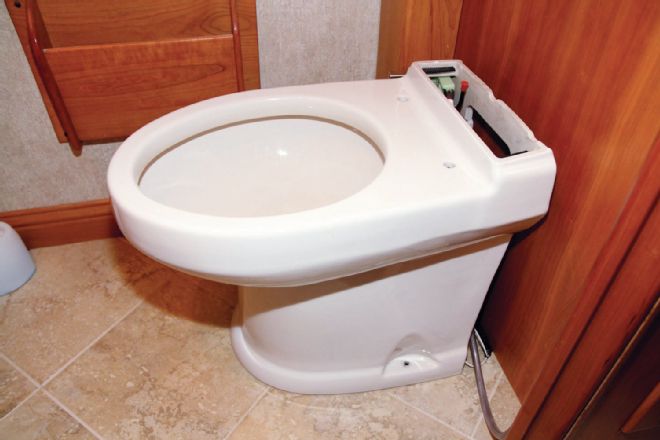
| 05: Once the seat and mechanism cover are removed, the toilet can be taken out of the RV.
After a bit more cleaning, the new rings were ready for installation. They were set in place, and I set the flush mechanism on top of the seals. The kit included new bolts, nuts, and washers, so I replaced those and tightened them evenly to ensure everything was level and not cocked. A warning decal stated the eyebolts should be torqued to 20 pound-feet and excessive torque could crack the china bowl. I followed these instructions to the T.
I carried the toilet back into the motorhome and set it in place. A bit of plumber’s grease was placed on the sealing O-ring to ensure an easy insertion into the waste line receptacle on the floor. I then reattached the water line and 12-volt power, and switched on the water pump to check for leaks. Once all leaks were found and fixed, I fastened the toilet to the floor with the two screws and reattached the trim covers. Finally, I reinstalled the toilet seat and access cover and tested the unit. The toilet bowl now held water, and everything worked fine.
All in all, this wasn’t a hard job, and I was able to do it in about an hour. You can do it in the RV while at a campground, if necessary, saving you the time and expense of going to a service center. A few simple hand tools and a pair of latex rubber gloves are all you need.


