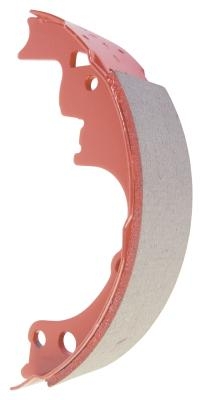
The parking brakes on a Chevrolet Silverado are located on the rear wheels only. They activate when a system of cables forces a pair of brake shoes out against the inside of a drum. Attached to the wheel hub assembly the shoes are an "O"-shaped unit connected by clips and springs. The drum, a part of the wheel, spins around them until the brake engages. Brake pad material wears down over time as friction rubs the surface material away. You can replace the parking brake in a few hours with a few basic tools.
Chock the front wheels. Loosen the rear wheel lug nuts with a lug wrench. Release the parking brake. Raise the rear of the vehicle with a floor jack, and position jack stands as described in the owner's manual. Remove the lug nuts and the wheels.
Replace two lug nuts onto the disc and hand tighten, which will prevent the disc from moving while you remove the caliper. Hold the caliper slide pins with an open-end wrench, and untie the caliper mounting bolts with a socket wrench. Detach the caliper, and suspend it from the frame with a length of wire.
Remove the caliper mounting bracket bolts located on the inside of the caliper mount with a socket wrench. Detach the caliper mounting bracket. Remove the lug nuts installed on the disc earlier, and slide the disc over the lug bolts and off the hub.
Release tension in the parking brake cable by loosening the nuts on the brake equalizer. This device sits underneath the vehicle on the driver's side. Use an open-end wrench to turn the nuts counterclockwise. Return to the back wheel, and locate a screw and clip at the bottom of the parking brake assembly that secures the brake shoes to the assembly. Remove the screw, and slide the shoes, as a single unit, up and off the brake actuator and over the axle flange.
Install the new shoes over the axle flange and onto the brake actuator. Check to ensure that the ends of the shoes at the top of the brake housing are correctly seated in the adjuster and tappet slots. Replace the screw and clip at the bottom of the housing to secure the shoes.
Turn the adjuster at the top of the brake shoes clockwise a half turn, which will push the shoes outward slightly. Replace the drum over the shoes, and hand tighten two lugs nuts to hold it in place. Spin the hub; continue turning the adjuster until the shoes begin to drag against the drum. At this point, remove the hub and back the adjuster off a little; continue adjustment until the movement becomes smooth. The actual distance between the shoes and the inside of the drum should be 0.026 inch.
Replace the caliper mounting brackets and caliper to the specified torque with a torque wrench. Replace the wheels and lug nuts. Tighten the equalizer nuts to regain tension in the cable. Lower the car. Test the parking brakes by depressing the parking brake pedal.