The Oldsmobile Silhouette is a minivan that was produced from the 1990s up until the closing of the Oldsmobile division by General Motors in 2004. Some models of the Silhouette used four-wheel disc brakes and drum brakes on the rear wheels as a parking brake while other models had disc brakes on only the front wheels and drum brakes in the rear. In either case, changing the disc and drum brakes on the rear wheels follows the same procedure, with more steps for the drum brakes than the disc brakes.
Use a tire iron to loosen the lug nuts on both rear wheels.
Place a floor jack under the rear frame and lift the van by the frame.
Place jack stands under the frame, adjacent to each rear wheel well.
Lower the back end of the van onto the jack stands.
Remove the lug nuts and the rear tires.
Use a wrench and socket set to remove the bolts holding the disc brake assembly in place. The bolts are located on the back side of the assembly.
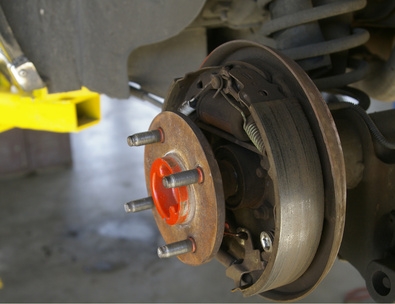
Remove the disc brake assembly with a screwdriver, prying the assembly upwards and away from the brake rotor.
Place a wooden block over the caliper piston. If the brake pad falls off, place the wooden block directly on the piston. If the pad remains in place and you are not changing the disc brakes, the block can go over the brake pad.
Hook a C-clamp over the wooden block and the caliper piston and tighten until the wooden block is firmly held against the piston.
Hook the arms of the brake drum puller evenly around the edge of the brake drum/rotor and tighten the central bolt until it is against the axle hub.
Tighten the central bolt by 1/2 turn with the wrench and socket set.
Tap the brake drum around the outside with a ballpeen hammer then turn the wrench 1/2 of a turn. If the drum moves forward, continue turning the wrench until the drum no longer moves or it falls off. If the drum does not move, repeat the tapping, 1/2-turn process until the drum moves easily.
Loosen and remove the brake drum puller from the brake drum.
Use needle-nose pliers to unhook the springs from the brake shoes.
Remove each brake shoe from the drum brake cylinder. Typically, the shoe will slide directly off, or there will be a slight hook to maneuver the shoe around.
Slide the new brake shoes into place and rehook the springs as they were attached to the old brake shoes. You will probably need to use the needle-nose pliers to hook the springs back onto the brake shoes.
Place the new brake drum/rotor over the drum brake assembly.
Remove the C-clamp and wooden block from the disc brake caliper.
Replace the brake pads into the disc brake assembly and place the assembly over the brake rotor.
Tighten the bolts that hold the disc brake assembly in place, as snugly as possible, with the wrench and socket set.
Place the tire over the axle hub and evenly screw on the lug nuts by hand.
Repeat the above procedure for the other side of the van.
Lift the rear of the van with the floor jack, remove the jack stands then lower the van to the ground.
Tighten all of the lug nuts with the tire iron.