 Verne Simons
Senior Editor, Jp
Verne Simons
Senior Editor, Jp
Frame Cracker
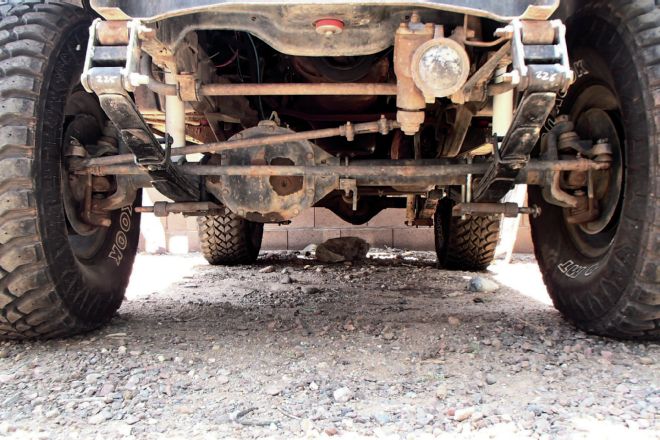
I have been faithful Jp reader for many years; love the mag. I’ve got an ’86 CJ-7 with Mopar MPI, NV4500, Dana 300 with a 4:1 conversion, factory Dana 44 in the rear, high-pinion Dana 44 in front, 4:56 gears, locked, full rollcage, 35-inch tires, spring-over axle with custom Alcan springs, and so on. Love my Jeep, but just found a crack in the frame; both sides of the “box” frame have vertical cracks extending down about half of the frame height right behind the drivers-side front body mount. The body mount is starting to tear from the frame as well. The body mount took a hit on a rock a while back, but I just noticed the frame starting to self-destruct. I wouldn’t consider myself unusually hard on my Jeep (sheetmetal is still straight), but I frequently run trails like Dusy-Ershim, Fordyce, and so on. I am not afraid to take the harder lines. Are frame-reinforcing plates worth it? Do they really work? I’ve conceded I will need to tear the Jeep down the frame for a proper fix or upgrade. However, the question is frame plates (such as from M.O.R.E.) or an aftermarket frame (such as from Throttle Down Kustoms)? Yes, the frame plates will be $1,000 to $1,500 cheaper when it is all said and done but will be more work. The most important thing is I only want to have to do it once.
Also, the original radiator is getting tired. I don’t have overheating problems, but it is weeping and just looks like it is ready to fall apart. Should I replace with a copper or aluminum radiator, or should I switch to an electric fan or keep the functioning engine-driven fan? Keep up the good work. Thanks!
Jeff Grimm
Via email
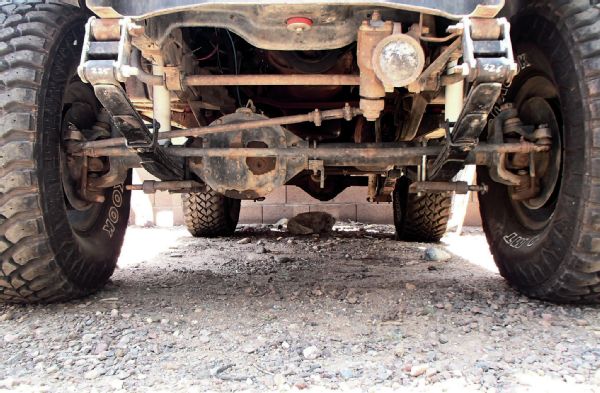
I hear you on the fix-it-once principle of frame repair. I don’t have much experience with Mountain Off Road Enterprises’ frame-reinforcement plates for CJ frames. They look like a great product that M.O.R.E. is known for (although Editor Trasborg has had good experience with them). They could be the perfect solution for you, but if money and time were no object, I would be seriously contemplating a frame swap. Why? Well, the frame plates may fix your current problem and are certainly the quickest and less expensive option, but at the end of the day, you are still fixing a CJ-7 frame, which may start cracking later on down the road—or trail (Trasborg reports that the CJ-7 frame he repaired did subsequently crack again). The Throttle Down Kustoms frame may be the best option—if money and time are not an issue—for the way you have, and probably will, use your CJ. If you’re interested in a third sort of middle-of-the-road option (in terms of cost), I would spend time researching a CJ to YJ frame swap. This is going to be a labor-intensive project (like swapping all your parts to the Throttle Down Kustoms frame), with more fabrication required on your end. You’ll have to move the body mounts or make new ones, but you’ll get a much cheaper, yet very strong, fully boxed frame. I’d avoid any YJ frames with any rust, as strong YJs frames are not very resistant to rust damage over time especially when dirt and sand get trapped inside the frame rails.
As for the radiator, there are plenty of aftermarket OE replacements in all types of metals. If I were you, I’d probably look for an aluminum radiator. Both electric and mechanical fans are great, but an electrical fan might be perfect for anyone who’s into rockcrawling as they spin just as fast when idling or running down the highway.
Dana 44s, 8.8s, and Saharas
Do the YJ Saharas have a Dana 44 rear like the TJ Saharas do? Also, which is a better axle swap for a ’94 YJ: a Dana 44 or a Ford 8.8?
Brad Young
Via email
I’ve never seen a YJ of any trim level with a Dana 44 rear axle that I believe was from the factory. There are rumors of them existing in Canada or south of the border. I suppose it’s possible that these rumored YJs with factory Dana 44s exist and could have trickled into the U.S., but it’s unlikely.
Also, for the record, I’ve seen Sahara TJs and JKs both with Dana 35 rear axle from the factory. Your best bet, if you have to have a Dana 44, is to learn to identify them.
As far as which axle is better to swap—an 8.8 or a Dana 44—that depends. The 8.8 is a little stronger than a Dana 44, but Explorer 8.8s are narrower than your YJ’s current axle (which is almost certainly a Dana 35). That means you’ll need to run wheel spacers on an 8.8. Now having said that, many Explorer 8.8s have a nice disc brake setup so that’s an upgrade too. If I were you, and you were going for swapping ease and cost, I would keep my eyes peeled for an XJ Dana 44. While brakes for the XJ (or MJ) Dana 44 are odd, it, like the factory TJ Dana 44, is a 30-spline non–C-clip axle, while the Explorer 8.8 is 31-spline and C-clip. The XJ/MJ Dana 44 is a relatively easy swap into a YJ, only needing new shock mounts and spring perches to be welded on.
Jack, the fix itself is a fairly cheap and easy one, but it does require some tools that you may or may not have. First, the pinion nut and yoke are on there really tight and for good reason. You don’t want them coming loose on their own any time soon. I’ve replaced lots of pinion seals, and it’s not that bad. Here are some tips: First, you have to remove the driveshaft from the axle. Then, use a pneumatic impact or air gun and a 11⁄8-inch socket to remove the yoke from the pinion. If you don’t have an air gun, you might be able to break the nut free with a long breaker bar. Anyway, one way or another, you’ll need to get it off so you can pull the yoke off the pinion. When you do this, be ready with a pan to catch gear oil, which may come out of the hole where the yoke was. Then, use a screwdriver or a seal puller to get the old leaky seal out of the way. More oil should drain out—let it. Hopefully you remembered to go to the parts store and get a new seal before you made your Jeep un-drivable, because it is now. Once oil has stopped drizzling out of the pinion, clean the mating surface where the old seal lived. You are best off using clean rags and some non-chlorinated parts cleaner, but you don’t want to hose the stuff into the differential because it’s going thin out your gear oil. Instead, spray some on the clean rag and then use the rag to wipe the gear oil off the circumference of the seal-mating surface. Now, using a piece of steel tubing that fits snugly inside the shoulder of the new seal and a hammer, you should be able to tap the new seal into place. Do this slowly, carefully working around the radius of the seal so you don’t damage it. Some people add a thin layer of silicone to the seal—I’ve done that and also installed them dry, both with success. If there are nicks or imperfections on the mating surface, silicone may be more critical. Once the seal is in place, rub a little grease on the small end of the yoke and slide it into place. Then, add a few drops of red Loctite to the pinion nut and gun it back down. Now, if you had a later Jeep with a crush collar like some XJs, TJs, YJs, ZJs, WJs, JKs, and so on, you can’t use an air gun to retighten the pinion nut or you may collapse the crush sleeve too much. Just use your 3⁄8-inch or 1⁄2-inch ratchet and tighten the nut as much as you can without using a cheater bar.
Lifting Cherokee
I read and reference Jp magazine regularly, but I need more advice. I have a ’95 XJ that I am upgrading from stock to 31-inch tires and don’t want go rabbit hunting with an elephant gun. No rockcrawling, mostly Florida sugar sand with some red clay and swamp mud, and water that’s not too deep. I’m looking at a Rusty’s Off-Road setup with a 3-inch lift. At the same time, I want to replace 3.07 gears with 3.73 gears, and the stock limited slip with a set of Aussie lockers (brand new and free) for the Dana 30 and Dana 35. Do I need upper control arms, adjustable-control arms, sway-bar quick-releases? Also, do I need to worry about driveshaft angles? I have an aluminum two-core radiator, Flowkooler water pump, front and rear 2-inch receivers. This is probably all I can afford for a good while. Any help making up my mind would be greatly appreciated.
W. Brady Eldridge
Inverness, FL
Well, it sounds like you basically have all the bases covered with your list of wanted parts. The suspension kit from Rusty’s Off-Road should have everything that you need to lift the Jeep, although I am not exactly sure which kit you are looking at. If the kit has full leaf spring packs for the rear, brake lines, front lower control arms, shocks, and the rest of the parts you’ve mentioned, you should be pretty well set up. As far as sway-bar disconnects, they can make quite a difference in flex while off-road, while keeping the Jeep stable on-road. I’d probably get them if I were you. As far as adjustable control arms, you should be fine without them as long as you don’t plan on going much taller than 3 inches (although I wouldn’t lift it over 3.5 to 4 inches without some sort of long-arm front suspension or drop brackets). For the driveshaft angles, using the T-case drop kit should keep you vibration free. If you later want to upgrade to a slip-yoke eliminator and a double-cardan-joint rear driveshaft, you can always do that once the bank account has recovered.
Lastly, just to clarify, if your Jeep has limited-slip differentials, then these Aussie Lockers are not going to be free. They are what are known in the industry as “lunch box lockers,” and most lunch box lockers replace the side gears in open differential carriers non-limited-slip differentials. That means you’ll have to find and buy open differential carriers for your axles to use these lockers. Also, lunch box lockers are not particularly strong as they are only as strong as the open differential carriers they are installed in. They should be fine for 31-inch tires, although you may want some chromoly axleshafts for the rear axle.
A/C Specs
I’ve got a couple of question on your article by Verne Simons, “Cool Breeze” (Aug. ’14). Do you guys know what the recommended amount of oil in the A/C is in ounces? What are the recommended low- and high-side pressures on the gauges? 34 to 150 psi? 40 to 200 psi?
Jeff McDonald
Via email
Our ’01 WJ uses a total of 12 ounces of PAG oil in the system. This could be different for differing years of Grand Cherokee and different types of Jeeps. You should check volumes for your Jeep using a factory service manual. Pressure ranges on the A/C gauges for both high and low sides depend on the ambient air temperature. You should be able to find a chart that lists these pressures for the different temperatures on the Internet or they should have come with your gauge set.
Steering Straight
Just a quick question on the proper way to make my steering wheel straight after installing a four-inch lift: I pulled the wheel, but can’t clock it straight and still get my signals to work. What am I missing?
Jeremy
Via email
Jeremy, the easiest way to correct this is to drive the Jeep and take note of the position of the steering wheel while the Jeep is going straight down the road. Think of the spokes as hands on a clock to help with positioning the wheel later. Then, drive the Jeep into your driveway and put the wheel in this position (above) so the tires are straight. Park the Jeep with the engine off and the steering wheel unlocked. Then, climb under the Jeep and loosen the clamps on both ends of the drag link adjuster (see image). The drag link is the steering rod that runs from the pitman arm to the passenger side of the Jeep. Once you have the drag link clamps loose, use a pair of pliers to turn it 90 degrees. Then, go look at your steering wheel. If the wheel is closer to the correct position, get back under the Jeep and keep turning the drag link the same direction (no more than one complete turn at a time) until the steering wheel is in the correct (centered) position. If it’s further from where it should be, then turn the drag link the other way until the steering wheel is in the right place. Then, tighten the clamps at the ends of the drag link. This is a lot easier if you have someone who can sit in the driver seat and tell you if you are turning the drag link the correct way or not and how far you need to go.
4.0L Stubborn Rear Main Seal Leak, Part 1
Regarding Chris Jackson’s letter about a rear main seal leak (Your Jeep, Aug. ’14), a coworker of mine has a ’99 TJ. After chasing a rear main seal leak for a while, an oil galley plug at the rear of the block above the crankshaft was found to be the source of his leak. Just a possibility that Chris should look into as well.
Mike Callender
White Lake, MI
Alright, now we are getting somewhere. Check the question below for more of a response from me.
4.0L Stubborn Rear Main Seal Leak, Part 2
I read about Chris Jackson’s stubborn rear main seal leak, and it sounded familiar. I had a ’02 Wrangler with a 4.0L that seemed to have a rear main seal leak. Since it was under warranty, my dealer changed the seal three times in a few weeks’ time. They then discovered it was not the seal at all. Apparently on the back of the block, behind the flywheel, is a threaded plug on one of the oil galleys. It was not tight. A little lock-tight and tightening the plug solved the problem.
Joe Gilbert
Via email
Oh, that sounds promising. I will email Chris Jackson about this. Hopefully it will solve all his issues and keep one guy in an LJ a little bit longer. Thanks for helping me do my job, but I think I remember saying he should look above the crank for a possible other source of the leak.
4.0L Stubborn Rear Main Seal Leak, Part 3
My brother and I have ’05 LJs and have replaced our main seals with success using factory (Chrysler) rear seal plus factory RTV. Remove the rear (number six) bearing cap and loosen the number five bearing cap. This should provide enough clearance for upper rear main seal installation. Check the upper groove for any nicks, dings or crap. Then, coat the inside diameter of seal with oil and that outside diameter with liquid detergent. Use a paper shoehorn or a cut a plastic straw to start the seal into upper groove. This is where it is best to have some assistance. As one person is rotating the seal up, the other is pushing in on the outside diameter. If the upper seal stops part way up, wait 10-15 seconds and restart pushing. You may have to do this two or three times, but it will rotate all the way around the groove. The lower bearing cap with a seal groove needs to be spotlessly clean, especially around the groove and chamfered edges. Install the lower seal, and apply a very thin bead of RTV on the chamfered edges, not on the flat surface of the cap (this would alter clearance of bearing). If done correctly, when cap is tightened, there will be a very small amount of RTV squeezed out along the chamfered edges.
The oil pan could also be a source of leaks. I replaced mine and had to go with the factory part (cost me about $200). I tried aftermarket oil pans, but all three had bad twists in them (1⁄4 inch to 3⁄8 inch) front to back in opposite corners. Quick test for this is to turn the pan upside down on flat surface and it should lay flat. The factory part was the only one that was flat
Jim Edison
Via email
Jim, thanks for the details. As mentioned in my response to Chris Jackson, if nothing else, someone should have installed his rear main seal well enough to prevent or at least slow the leak. I’ll bet money (although not much) that his issue is from this apparently sometimes loose and leaky plug in the back of the block mentioned in Mike Callender’s and Joe Gilbert’s emails (above). Still, what you say here reminds all of us the importance of following the proper procedure and using quality parts on a critical repair like the rear main seal. Thanks for the details on how you and your brother obtained a leak-free rear main seal replacement.
Back Issues
Is there any way to get an old issue or article? I bought a Jeep that was pictured in your magazine. I would love to get a copy or two of the particular issue with my new (to me) Jeep in it.
Casey Stagg
Via Facebook
For any and all back issues, check out simbackissues.com. There is a good selection of back issues there, if it is still available. Otherwise, you can check eBay for a given issue.
Nice Rear!
On the last page Aug. ’14 issue, whose Blue Jeep is that in the Falken ad? Who is the manufacturer of that rear bumper?
Jason
Via FaceBook
Jason, we in the industry call that Cover Four. Based on all the GenRight parts on it, I’d be willing to bet that that Jeep belongs to them. Also, after having a look at the image and then spending some time on GenRight’s website, we found that bumper. It’s called a Rear Bumper Plate with a 2-inch receiver hitch and retails directly from GenRight for $319.99 (PN RTC3530). It’s a pretty sexy looking Jeep and a darn nice rear bumper.
God’s Green Earth
I enjoyed the article about cooling the air in anything inexpensively. I am doing this myself. One question: Where on God’s green earth did you find a hose barb to fit the bottle? I have accumulated everything I need minus that barb. No store I’ve been to around here seems to have it. Any help would be appreciated. I want to be cool in my Jeep too.
Donnie Salter
Chattanooga, TN
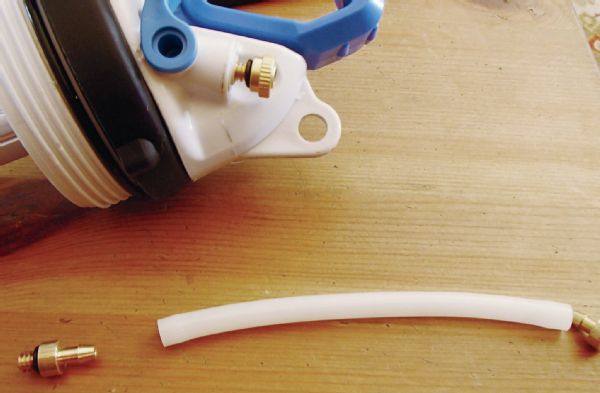
Donnie, those white flexible nozzles I bought at the hardware store had a barbed fitting with the correct thread count on one end. I used the mister end on the ends of the hoses and the threaded end on the pump. Hope that helps!
Write Us!
Got a tech question you’re just itching to get answered? Send it on in to Jp Magazine, Your Jeep, 831 S. Douglas St., El Segundo, CA 90245, or e-mail it to verne.simons@jpmagazine.com.