EZ Driveline Upgrades - Eliminate The Slip Yoke - 4Wheel & Off-Road Magazine

EZ Driveline Upgrades - Eliminate The Slip Yoke Jerrod Jones Former Editor, Off Road

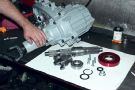
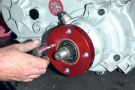
The best way to fix the slip-yoke on the back of your transfer case is to get rid of it. Period. There's really no advantage to having a slip-yoke on your NP231J, 231C, 231HD, 241C, 241D, or 243 with the exception of cheaper driveshafts and the fact that you already have one (if you do). And though a fixed-yoke conversion kit (aka slip-yoke eliminator or SYE) like this one from JB Conversions is a great thing to have, you must ask yourself if it is worth it. Slip-yoke tailends on transfer cases have absolutely nothing wrong with them under normal driving conditions, and are every bit as strong as the alternative. And besides the cost of the fixed-yoke kit (usually $200-$350, depending on what transfer case), you should also remember to include the cost of the new driveshaft with a slip-yoke (you must either have a slip-yoke on the driveshaft or transfer case to allow for suspension cycling and differentiating lengths as that occurs).

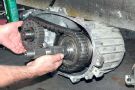
But even with the added cost, you want one, trust us. With a fixed yoke, you can damage your rear driveshaft, remove it, and still drive home in front-wheel drive. It also lets you run a longer driveshaft-or even a CV-joint-driveshaft for better driveshaft angles and less vibration. The major problem (and really the only one) with a slip-yoke on the back of a transfer case is that it will fall out of the back of the transfer case and you'll lose your gear oil if you pull the rear driveshaft.

PhotosView Slideshow JB Conversions gives very complete and detailed instructions, making the SYE install a snap. We first took a look at what pieces we would be replacing, and pulled the transfer case off the back of the transmission to make our job easier. The original mainshaft and slip-yoke (right), and the JB Conversion fixed-yoke mainshaft and fixed yoke (left). Notice how much shorter the fixed-yoke version of the transfer case is going to be. This is very beneficial if dealing with excessive driveline angles, but on our particular vehicle, the driveshaft length is long enough for it to really not make a difference. Remove the chaindrive gear off the mainshaft along with anything else according to the directions. You may (depending on what year, make, model, and how the OEMs were feeling that day) need to press out a roller bearing inside of the chain gear to allow for the bigger mainshaft that rides metal to metal instead of on roller bearings. This type of setup is probably a little stronger than one equipped with roller bearings, and does not create a premature wear issue if proper lubrication is taking place. Before you reassemble the case, make sure the chain is not stretched and that the nylon shift fork pads are not worn out. Once the gears and shafts are reassembled, slide both shafts, gears, and chain into the housing together. JB Conversions includes this anodized-aluminum tailhousing end and new bearing for the fixed yoke to ride in. Four Allen bolts (included) are all that it takes to snug it up. The 32-spline fixed yoke should slide on relatively easily. The kit comes with a 1310 U-joint yoke, but JB Conversions includes the Spicer part numbers for 1330, 1350, and 1410 yokes should you want to upgrade to a bigger U-joint on your driveshaft.