
You aren't going to drive your hot rod very far if it has cooling problems. And getting it right the first time may not be enough, as cooling problems can arise anytime during the hot rod's lifetime. Typically these heating problems are the results of less than timely maintenance or a gremlin that manifests itself over time until the end result is: "My hot rod is running hot and I can't figure out why?"
To track down cooling problems there are a number of things that you can do. And by following the steps in this story you will learn some handy tips, as well as potential hiccups you didn't realize could be a problem. There are some basics that are fundamental and shouldn't be overlooked. By checking the obvious you can often solve, or begin to solve, overheating problems. To get answers to some of these questions we visited a number of industry sources; from radiator to fan to overflow canister (tank) to coolants to pulleys to air conditioning to gauges, and so on. Before fixing a cooling problem you have to understand what the problem is and what caused it. Fixing a cooling problem is twofold; find the problem and fix it and also correct the core problem.
Sometimes an overheating vehicle just requires a good visual inspection. Debris can obstruct airflow but be difficult to see due to the tight quarters inherent with most hot rods. Don't overlook the obvious, like a collapsed lower radiator hose. A problem that typically arises with longer hoses. On cars with A/C check for debris in between the condenser and radiator, especially after winter storage. (As retired GM hot weather engineer Scot Leon told us, "It's amazing what industrious little critters can store in some unusual places in your hot rod; especially between the radiator and condenser." Make sure your fan(s) are rotating in the right direction and, remember, a high pressure system can run hotter than a low pressure system without boiling. An overflow canister (tank or bottle) and appropriate cap keep the radiator full and "air out" the radiator. A radiator full of coolant is most efficient. (Sometimes it helps to drill an 1/8-inch hole in the thermostat to allow air to bubble to escape from under the thermostat on the initial fill with a new motor.)
To get the lowdown on a wider variety of cooling issues we dropped by U.S. Radiator and spoke with Don Armstrong as he gave us a number of tips for tracking down the cause of an overheating problem.
In a career as a radiator guru Armstrong has identified the two most common scenarios when a car will overheat: one, the engine maintains water temperature at or near thermostat setting while at low speed or idle but gradually heats up as speed and horsepower increases; two, the engine maintains water temperature at or near thermostat setting (10-25 degrees above) while cruising at highway speeds or climbing a hill but overheats at low speed or idle. Scenario two involves airflow and is the most common.
According to Armstrong, "I've found that 40 percent of the time a customer comes to us for a radiator to solve an overheating problem and the radiator was the last thing that needed looking at."
Think about this: Should your hot rod be overheating? At highway speeds, your engine is making horsepower and horsepower is heat. If the car runs within the 10-25 degrees of thermostat while making horsepower you can pretty much rule out a radiator problem because it's handling the heat at the engine's peak output. When the car slows down or gets stuck in traffic and overheats the only thing that has changed is the airflow and coolant flow—airflow being the more important of the two. At low speed or idle you no longer have the luxury of ramming air through the grille and have to rely on fans, either mechanical or electric. The function of either type of fan is to keep airflow through the radiator at such a rate as to maintain temperature drop (approximately 30 to 40 degrees from radiator inlet to outlet). Airflow management is crucial in low speed or idle temperature drop. The most important aspect of airflow management is a shroud and well-placed fan in order to utilize the full area of the radiator core. Fans are circular in design and radiator cores are rectangular so in order to utilize every square inch of the radiator core a shroud is paramount whether the fan is mechanical or electric. According to Armstrong, "With electric fans here at U.S. Radiator we recommend using a shallow box shroud that covers the entire face of the radiator core and becomes the platform for mounting the fan. The shroud is only 3/4-inch thick and will fit in most tight engine-to-radiator applications and promotes airflow through all four corners of the radiator. Without a shroud the fan is only pulling air through an area equal to the circumference of the fan, utilizing only 60 percent of the radiator's cooling capacity. The same holds true for a mechanical fan but the placement of this fan within the shroud becomes more critical. Ideal placement of a mechanical fan within a shroud is a third of the leading edge of the fan in the opening of the shroud and two-thirds of the trailing edge of the fan out of the shroud, which results in approximately a 45 percent angle of airflow out of the shroud. Any other placement of the fan in the shroud will result in the air flowing out of the shroud straight back toward the block and reducing airflow efficiency by approximately 20 percent in most vehicles. Another critical aspect of airflow management at low speed or idle are "air dams" that prevent hot engine compartment air from flowing around to the front of the radiator. Any vehicle whose OE design placed the radiator farther back from the grille will benefit by making and utilizing air dams to ensure only ambient temperature air flowing through the grille to the front of the radiator comes into play. Having hot engine compartment temperatures reaching the front of the radiator over, under, or around the sides is the equivalent to driving on a 200-degree day as opposed to say an 80-degree day and needs to be addressed for low speed or idle overheating problems.
1-2. When sending units are mounted too close to the exhaust this can cause the gauge to give too high a reading. Ideally mount the temp sender in the intake manifold.">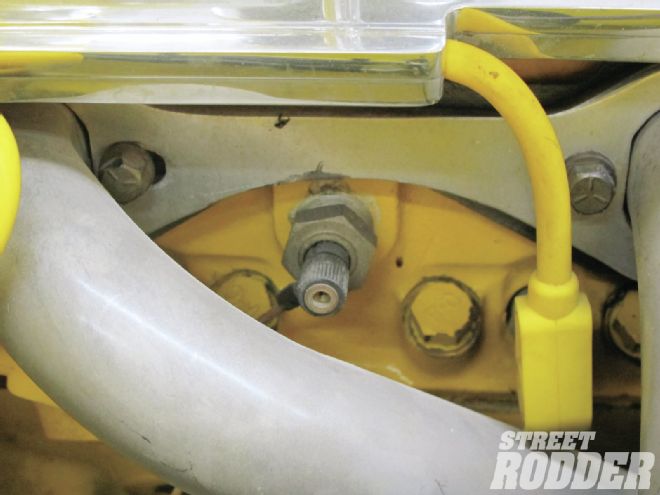 <strong>1-2</strong>. When sending units are mounted too close to the exhaust this can cause the gauge to give too high a reading. Ideally mount the temp sender in the intake manifold.
1-2. When sending units are mounted too close to the exhaust this can cause the gauge to give too high a reading. Ideally mount the temp sender in the intake manifold.">
<strong>1-2</strong>. When sending units are mounted too close to the exhaust this can cause the gauge to give too high a reading. Ideally mount the temp sender in the intake manifold.
1-2. When sending units are mounted too close to the exhaust this can cause the gauge to give too high a reading. Ideally mount the temp sender in the intake manifold.">
 <strong>1-2</strong>. When sending units are mounted too close to the exhaust this can cause the gauge to give too high a reading. Ideally mount the temp sender in the intake manifold.
3. Since our '34 Ford was tired and in need of maintenance and makeover we opted to freshen the gauges and sending units. A full set of Classic Instrument Hot Rod gauges were installed along with the Sky Drive GPS system.">
<strong>1-2</strong>. When sending units are mounted too close to the exhaust this can cause the gauge to give too high a reading. Ideally mount the temp sender in the intake manifold.
3. Since our '34 Ford was tired and in need of maintenance and makeover we opted to freshen the gauges and sending units. A full set of Classic Instrument Hot Rod gauges were installed along with the Sky Drive GPS system.">
 <strong>3</strong>. Since our '34 Ford was tired and in need of maintenance and makeover we opted to freshen the gauges and sending units. A full set of Classic Instrument Hot Rod gauges were installed along with the Sky Drive GPS system.
4. Check for proper "juice" to the gauge while at the same time checking for a proper ground.">
<strong>3</strong>. Since our '34 Ford was tired and in need of maintenance and makeover we opted to freshen the gauges and sending units. A full set of Classic Instrument Hot Rod gauges were installed along with the Sky Drive GPS system.
4. Check for proper "juice" to the gauge while at the same time checking for a proper ground.">
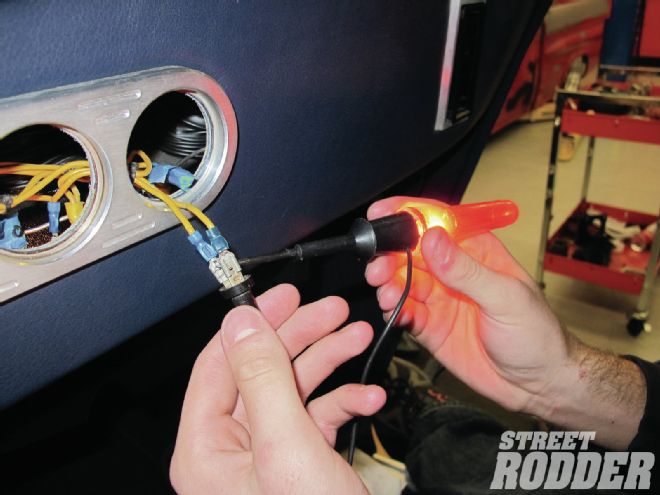
 <strong>4</strong>. Check for proper "juice" to the gauge while at the same time checking for a proper ground.
Unlike airflow where more is always better, coolant flow at low speed or idle affects temperature drops in the radiator differently. While increased airflow has no negative effect on cooling, a slight increase in coolant flow at idle most often produces a positive effect on temperature drop but too much flow can push the coolant through the radiator too quickly and back to the engine without adequate cooling, resulting in an even greater amount of overheating. It helps to understand that coolant flow created by the water pump is regulated by the thermostat first by remaining closed until desired minimum coolant temperature is reached and then by restricting flow to approximately 3-1/2 to 4-1/2 gallons per minute at an 800-rpm idle in a small-block Chevy. These flow rates are designed by OE engineers and extensive testing for maximum efficiencies throughout the rpm range and getting too far afield from original factory specs can work against a low speed or idle overheating problem. The restriction in the small opening in the thermostat as opposed to the 1-1/2 inches opening in the housing or hose is designed to slow and regulate the coolant flow through the radiator to give ample time to drop temperature throughout the rpm range from idle to highway speeds and resulting water pump flow rates. According to Armstrong, "In our testing at U.S. Radiator we've found that increasing flow rates slightly at idle helps to minimize temperature gain. The most efficient ways to do this are by using a "super-stat" with a slightly larger opening that allows about 10-15 percent increase of flow at idle without creating a negative effect at high speeds or by increasing the flow rate of the water pump by about the same percentile." (Armstrong recommends a 160-degree super stat on most engines and 180-degree for fuel injection. Since many hot rodders are concerned with fuel efficiency he recommends engine-operating temps in the 175- to 195-degree range. Higher operating temps will burn fuel more efficiently but the increase in operating pressure and metal distortion can easily create problems over time.)
For cars that tend to run close to thermostat at low speed or idle but gradually climb up the temperature scale while driving, check out two functions. First would be water pump performance just because of the cost of the pump versus that of a new radiator. If the pump is in good condition with little or no wear to the impellers and designed for street use as opposed to track or racing where flow rates are extreme then it's time to look at the radiator, which is the most critical and expensive part in the cooling system.
In looking at U.S. Radiators' several different models of radiators Armstrong explained to us about current radiator design. It is referred to as "high-efficiency" core design, which describes a 3/8-inch fin and tube spacing with a maximum core thickness of 2-5/8-inch for adequate airflow. For aluminum radiators the most common performance core would be two rows of 1-inch tubes (two linear inches of fin bond) with 3/8-inch fin. For copper and brass radiators, four rows of 1/2-inch tubes (two linear inches of fin bond) with 3/8-inch fin and tube spacing has become the standard. Both aluminum and copper/brass in high efficiency design are more than adequate for most street rods and performance restorations with the advantage going to copper/brass because of copper's greater efficiency of heat transfer.
Armstrong recommends the following radiator styles based on engine horsepower: Four-row high-efficiency copper/brass radiator up to 450 hp. Above that horsepower and for blower motors he recommends using their Optima core, which is 1/4-inch fin and tube spacing and "triple flow" the radiator with baffles, which is as good as it can get when it comes to heat transfer and pure temperature drop inlet to outlet.
Something relatively new in radiator design from U.S. Radiator is the triple pass core. As the name implies, coolant flows through the core more than once. In a standard single-pass radiator the coolant enters one tank, travels through the core, and drops in temperature based on that particular core's ability to reduce temperature (usually about 30 degrees).
Once the coolant reaches the other tank it goes back to the engine at whatever temperature the core was able to reduce it to. In a triple pass design the coolant actually travels three times as far in the airflow without changing the speed of the flow, which creates an even greater temperature drop (usually an additional 20 degrees), depending on the design of the core or heat-transfer points.
The thermal conductivity or heat transfer rate of copper is 92 percent versus aluminum at 49 percent. However the copper fin is bonded to the tubes or water passages using lead solder, which is very inefficient and slows the heat transfer rate to just slightly better than that of aluminum. This can be a disadvantage if the bonding process does not allow the copper fin to touch the brass tube.
Copper/brass radiators, because of their weight and durability, have been around a long time and are easily disassembled and reassembled for cleaning purposes. Not the case with aluminum unless speaking of the OE version that comes with crimp-mounted plastic tanks. As a result, the life expectancy of the aftermarket aluminum radiators will be far less than that of copper/brass.
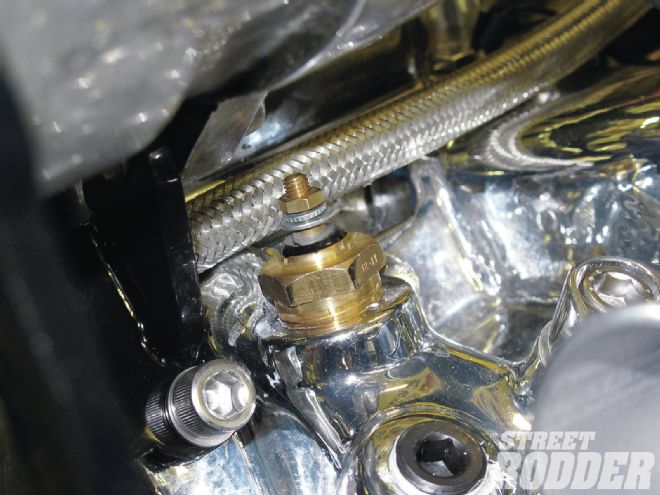
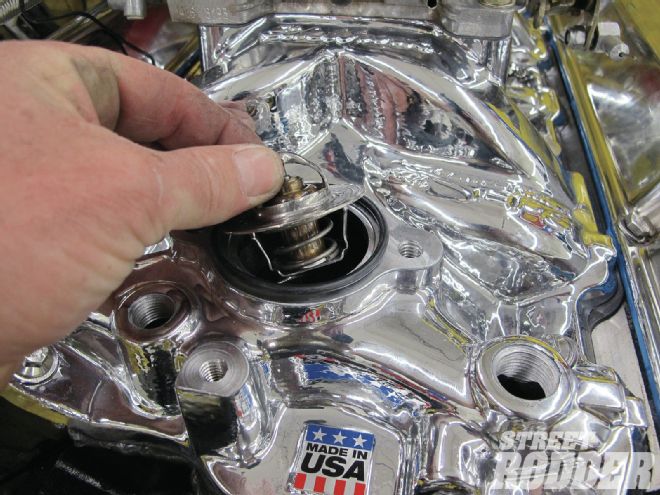
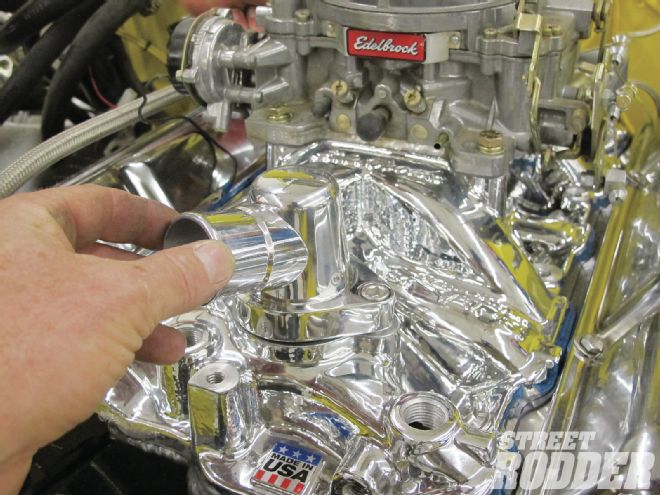
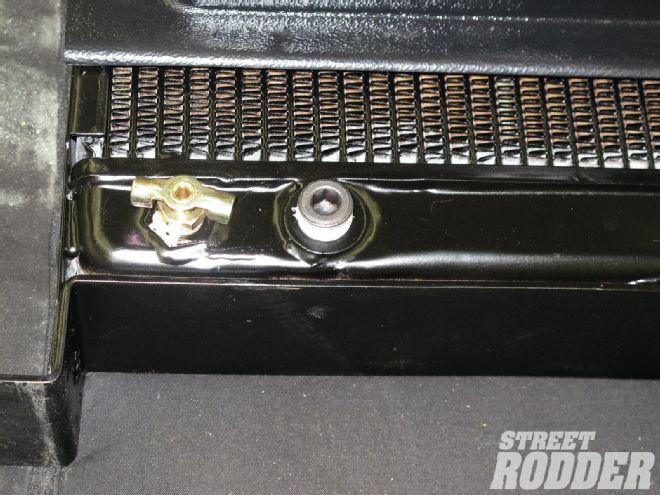
5-6. A new 160-degree thermostat with an 1/8-inch hole drilled was used along with a new rotating stat housing.">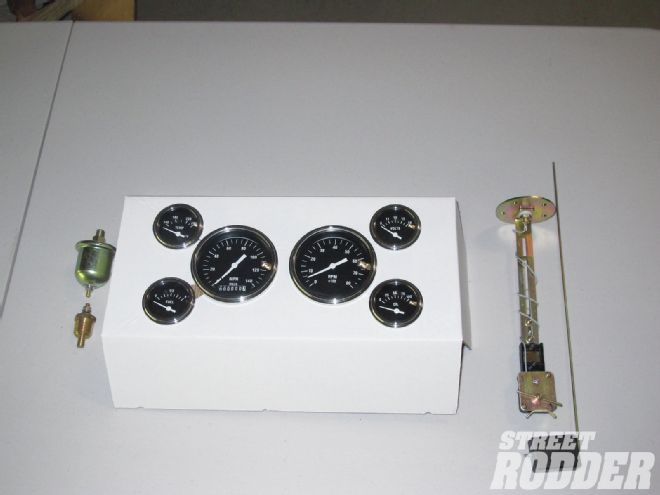 <strong>5-6</strong>. A new 160-degree thermostat with an 1/8-inch hole drilled was used along with a new rotating stat housing.
5-6. A new 160-degree thermostat with an 1/8-inch hole drilled was used along with a new rotating stat housing.">
<strong>5-6</strong>. A new 160-degree thermostat with an 1/8-inch hole drilled was used along with a new rotating stat housing.
5-6. A new 160-degree thermostat with an 1/8-inch hole drilled was used along with a new rotating stat housing.">
 <strong>5-6</strong>. A new 160-degree thermostat with an 1/8-inch hole drilled was used along with a new rotating stat housing.
7. A set of stock ratio pulleys from Bill's Hot Rod Company guarantees that alternator and water pump will spin at an ideal rpm throughout the operating range.">
<strong>5-6</strong>. A new 160-degree thermostat with an 1/8-inch hole drilled was used along with a new rotating stat housing.
7. A set of stock ratio pulleys from Bill's Hot Rod Company guarantees that alternator and water pump will spin at an ideal rpm throughout the operating range.">
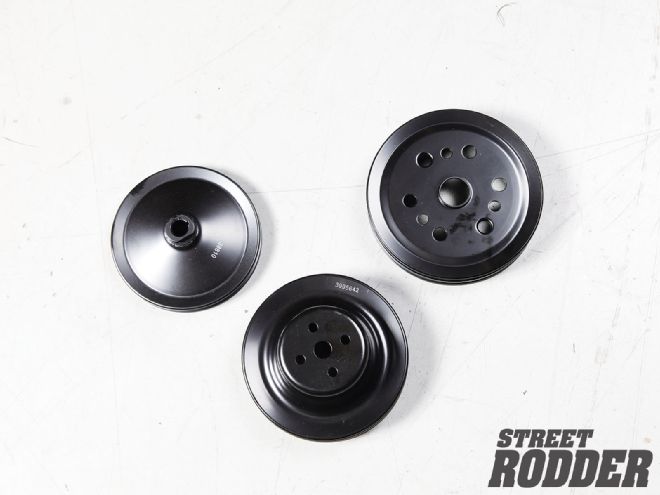 <strong>7</strong>. A set of stock ratio pulleys from Bill's Hot Rod Company guarantees that alternator and water pump will spin at an ideal rpm throughout the operating range.
8. You are looking for an alternator pulley ratio of between 2:1 to 3:1 to guarantee ample charging during low-rpm driving, such as cruising. ">
<strong>7</strong>. A set of stock ratio pulleys from Bill's Hot Rod Company guarantees that alternator and water pump will spin at an ideal rpm throughout the operating range.
8. You are looking for an alternator pulley ratio of between 2:1 to 3:1 to guarantee ample charging during low-rpm driving, such as cruising. ">
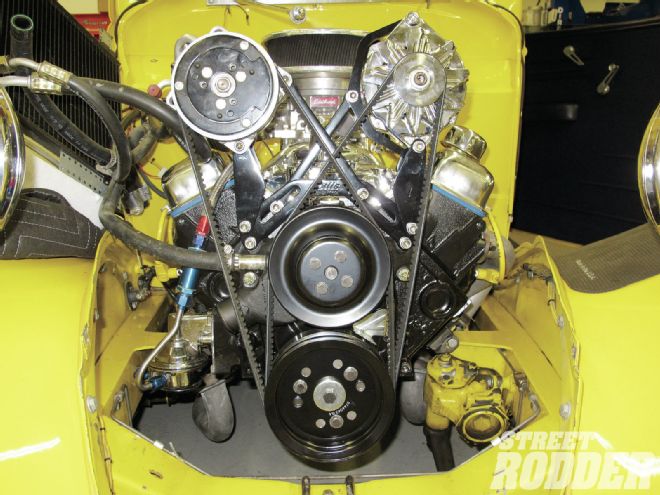 <strong>8</strong>. You are looking for an alternator pulley ratio of between 2:1 to 3:1 to guarantee ample charging during low-rpm driving, such as cruising.
9. We used one of U.S. Radiator's triple flow copper/brass radiators.">
<strong>8</strong>. You are looking for an alternator pulley ratio of between 2:1 to 3:1 to guarantee ample charging during low-rpm driving, such as cruising.
9. We used one of U.S. Radiator's triple flow copper/brass radiators.">
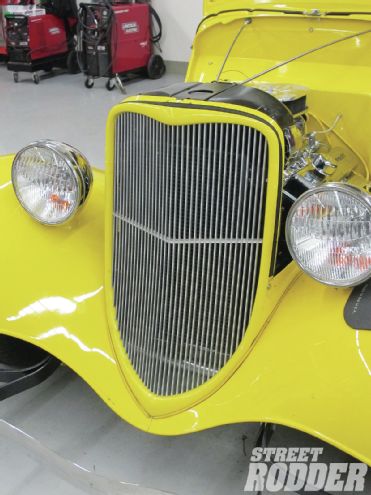
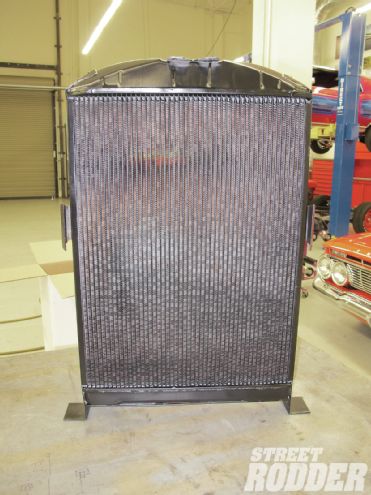 <strong>9</strong>. We used one of U.S. Radiator's triple flow copper/brass radiators.
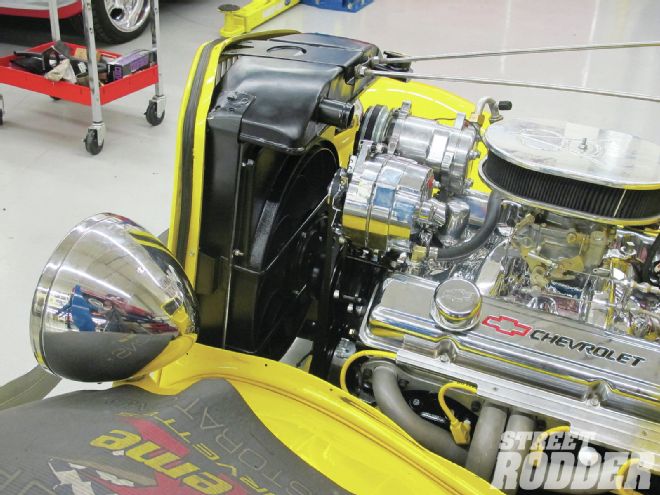
10. The LoPro Vintage Air electric fan comes with its own shroud and covers virtually every square inch of the radiator and was mounted as a puller; ideal situation.">
<strong>9</strong>. We used one of U.S. Radiator's triple flow copper/brass radiators.
10. The LoPro Vintage Air electric fan comes with its own shroud and covers virtually every square inch of the radiator and was mounted as a puller; ideal situation.">
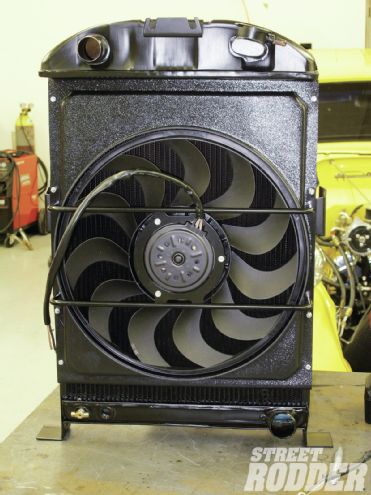 <strong>10</strong>. The LoPro Vintage Air electric fan comes with its own shroud and covers virtually every square inch of the radiator and was mounted as a puller; ideal situation.
An increase in thickness that allows a greater fin bond surface will yield a greater temperature drop. When going from a two-row to a four you double the fin bond or heat transfer points. The increase however isn't a one to one because the transfer efficiency of the trailing rows is adversely affected by the increase in air temperature from the previous rows and the decrease in air velocity caused by the increased thickness.
There are formulas to determine appropriate radiator size based on engine heat output (operating Btu's) and radiator heat transfer rates (also stated in Btu's). They can be found in any engineering handbook but Armstrong recommends installing the most efficient radiator that fits the hole or intended application, up to a four-row copper/brass or two-row aluminum core.
Nowadays any hot rod, no matter how individually built, can have air conditioning. Because companies like Vintage Air manufacturer universal as well as vehicle-specific A/C units, the installation is well within the reach of all hot rodders. We stopped by our friends from San Antonio to gather some input about A/C and how it impacts a hot rod's cooling system.
Since I am not allowed around any sharp edges I could only wave to Vintage Air head "cool" dude Jack Chisenhall who was on the manufacturing floor as I spent my time safely locked up in the Vintage Air office of Rick Love, who is equally conversant on the subject of A/C and its impact on the cooling system.
Love wanted to make sure that we stressed the importance of the proper mounting of the condenser with respect to the radiator. He told us that should the condenser be mounted more than 1/4-inch away from the radiator, it's important to consider some type of shroud or seal between them. Air will always take the path of least resistance (according to Love, "like a woman". I might have said "like electricity", but, hey, I just swing at the pitches I'm given!). The shroud or "packing" (OEMs use foam or rubber seals) will ensure that cool air will be drawn by the fan is flowing through both the condenser and the radiator, not just pulled in around the condenser.
Other radiator components are just as important to a properly cooling system. To guarantee peak performance the proper mixture of clean coolant, radiator caps, and a working overflow system are all critical. All late-model engines are sealed systems, which require a proper cap. There are basically two types of caps: open system caps and sealed system caps. To tell the difference simply hold the cap up at eye level and if the silver valve button in the center bottom of the caps hangs loose it's an open system cap and not recommended for late-model use. If you can pull on the silver valve button and it snaps shut when released it's a pressurized cap and is working properly.
Cooling system operating pressures are largely determined by water pump operating pressures and according to Armstrong he recommends keeping it under 10 pounds. Armstrong tell us that, "We all know by increasing the system pressure by 1 pound we increase the boiling point by 3 degrees so by running a 12-pound cap our water won't boil until it gets to 248 degrees. Trust me, an engine that wants to run at 248 degrees will open that cap up long before it gets that hot. To deliberately increase the operating pressure to increase cooling is redundant in my opinion and again only points out the need for more efficient heat transfer."
Pressures will increase in the system just after turning off the engine as the coolant absorbs existing engine heat but can't move through the radiator to dissipate it. The resulting increase in pressure pushes coolant past the cap and hence the need for a coolant recovery system (canister, tank, bottle). Once the coolant in the idle engine starts to cool a vacuum is created and another valve in the cap opens and prevents the radiator from collapsing a top tank but more importantly returns the coolant to the radiator so no outside atmosphere or air (contamination) enters the sealed system. Unfortunately most aftermarket recovery tanks are smaller than the needed capacity and that varies with cubic inches and size of the engine.
Overflow bottles should be used on all pressurized systems to eliminate air in the system and maintain proper coolant levels. For our refurbishing of an aging cooling system we opted to install a Dan Fink Metalworks polished aluminum overflow canister (tank). Our tank will hold 2.2 quarts and measures 4x4x9-1/2 inches. Once the radiator cap is installed on the radiator all coolant level checks should be done at the overflow canister. Only if the overflow is empty should the radiator cap be removed to visually inspect levels. Be sure you have an adequate size canister. If there are no other visual leaks in the system and the canister continuously goes empty you either have a leak in the hose between the radiator and the overflow or the overflow is inadequate for the amount of expansion your engine produces when shut off. If necessary, replace the rubber hose between the cap and the overflow or replace overflow with a larger capacity canister to prevent air from entering the system during cool down. Keeping air out of the system is paramount when it comes to maintenance. Radiators don't rust but most engines blocks will if exposed to air so keeping the system tight and annually changing the fluids will provide years of trouble-free operation.
11. Once the U.S. Radiator was in position, we affixed the Vintage Air condenser to the front of the radiator. ">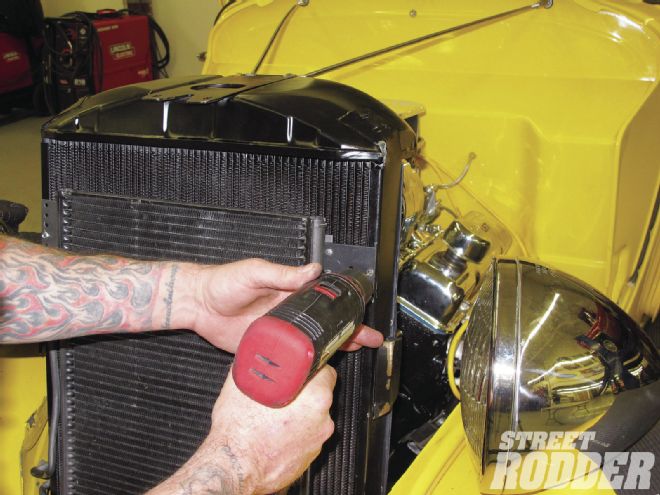 <strong>11</strong>. Once the U.S. Radiator was in position, we affixed the Vintage Air condenser to the front of the radiator.
12. The condenser, once mounted to the radiator, should have no more than a 1/4-inch gap; if more then some form of shroud or packing is required. You want to make sure that cool air will be drawn by the fan and not just pulled in around the condenser.">
<strong>11</strong>. Once the U.S. Radiator was in position, we affixed the Vintage Air condenser to the front of the radiator.
12. The condenser, once mounted to the radiator, should have no more than a 1/4-inch gap; if more then some form of shroud or packing is required. You want to make sure that cool air will be drawn by the fan and not just pulled in around the condenser.">
 <strong>12</strong>. The condenser, once mounted to the radiator, should have no more than a 1/4-inch gap; if more then some form of shroud or packing is required. You want to make sure that cool air will be drawn by the fan and not just pulled in around the condenser.
13. Use a Teflon tape around the threads of all fittings going into the radiator.">
<strong>12</strong>. The condenser, once mounted to the radiator, should have no more than a 1/4-inch gap; if more then some form of shroud or packing is required. You want to make sure that cool air will be drawn by the fan and not just pulled in around the condenser.
13. Use a Teflon tape around the threads of all fittings going into the radiator.">
 <strong>13</strong>. Use a Teflon tape around the threads of all fittings going into the radiator.
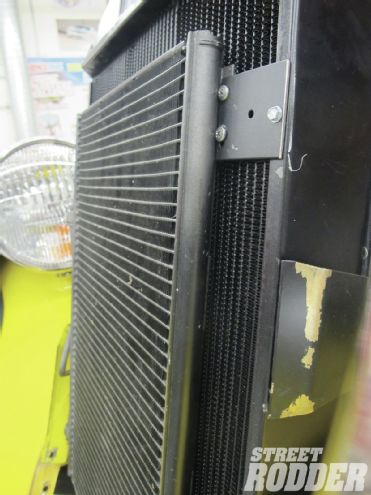
14. Once the radiator is in position you will begin what can become tedious: the fitment of the sheetmetal.">
<strong>13</strong>. Use a Teflon tape around the threads of all fittings going into the radiator.
14. Once the radiator is in position you will begin what can become tedious: the fitment of the sheetmetal.">
 <strong>14</strong>. Once the radiator is in position you will begin what can become tedious: the fitment of the sheetmetal.
15. With all the cooling components back in position it's time to work on radiator hoses. Whenever possible use hoses with an internal spring to prevent hose collapse.">
<strong>14</strong>. Once the radiator is in position you will begin what can become tedious: the fitment of the sheetmetal.
15. With all the cooling components back in position it's time to work on radiator hoses. Whenever possible use hoses with an internal spring to prevent hose collapse.">
 <strong>15</strong>. With all the cooling components back in position it's time to work on radiator hoses. Whenever possible use hoses with an internal spring to prevent hose collapse.
16. This Dan Fink Metalworks polished aluminum recovery tank holds 2.2 quarts and utilizes a 1/4- or 5/16-inch hose from the radiator to the tank and then a 3/16-inch hose as a vent from the tank to the ground. Comes with fittings and rubber isolation mounts.">
<strong>15</strong>. With all the cooling components back in position it's time to work on radiator hoses. Whenever possible use hoses with an internal spring to prevent hose collapse.
16. This Dan Fink Metalworks polished aluminum recovery tank holds 2.2 quarts and utilizes a 1/4- or 5/16-inch hose from the radiator to the tank and then a 3/16-inch hose as a vent from the tank to the ground. Comes with fittings and rubber isolation mounts.">
 <strong>16</strong>. This Dan Fink Metalworks polished aluminum recovery tank holds 2.2 quarts and utilizes a 1/4- or 5/16-inch hose from the radiator to the tank and then a 3/16-inch hose as a vent from the tank to the ground. Comes with fittings and rubber isolation mounts.
With most hot rods, especially on pre-'49 cars, there's a clearance problem between the radiator and the modern V-8 water pump system; later model cars, like a Tri-Five or '60s-era cars that have ample clearance between modern water pump system and the radiator. Knowing this rodders are faced with using thin (2-5/8 to 3 inches thick) electric fans in place of mechanical fans (block driven). In our '34 Ford sedan that was experiencing cooling woes we opted for an electrical fan as there wasn't sufficient room to run a mechanical. Since we are running a Vintage Air A/C unit (condenser and other related components) we opted to stick with one of their electric fans; the LoPro electric fan and shroud assembly that measure 2.62 inches in thickness. Another Vintage Air item is the Adjustable Fan Thermostat that allows you to set the engine temperature (180 to 240 degrees) that the electric fan will engage. There is a probe that installs into the radiator drain via a fitting. It can be used separately or with a Vintage Air A/C trinary function safety switch.
However, according to Armstrong wherever possible he likes to use the mechanical fan. He prefers mechanical fans with flex curved blades (3 inches deep from leading edge to trailing edge) with six or seven blades dependent on radiator core size and in one of three popular diameters of 15, 16, or 17 inches. Fan shrouds are always a must for mechanical or electric. Now, electric fans generally come with at least a minimum of a shroud but you can also make a more elaborate shroud that will yield these fans even more efficiently.
Your cooling system is dependent upon a mechanical fan at idle or low speed where there's little or no airflow. Shrouds are necessary to maximize the amount of ambient air being pulled through the grille and radiator. For the record, proper fan and shroud alignment should be leading edge one-third in and trailing edge of the fan two-thirds out. The airflow off the back of the fan deflects at about a 45-degree angle when set this way. When the blade extends further into the shroud the air off the back of the blade flows straight back into the block and decreases the airflow efficiency by about 15 percent.
That being said, if an electrical fan is the only way to go then by all means place it on a shroud that covers the entire core. We often see an electric fan attached directly to the core and the only thing this does is waste the rest of the core surface when you need it the most. A 16-inch electric fan attached to a core only cools a 16-inch circular section of that core. Where space is an issue U.S. Radiator offers a 3/4-inch-deep aluminum shroud that enables adequate airflow over the entire core and when combined with a thin-line electric fan it results in a total depth of 2-3/4 inches.
According to Love (like Armstrong) they used to always recommend engine-driven (mechanical) fans because the electric fans available usually just weren't up to the task of a primary cooling fan. However, Vintage Air offers several electric fans (their own model LoPro, SPAL, and Maradyne) that they feel will work well as primary cooling fans. Electric fans have several advantages. They are not dependent on engine rpm to provide maximum airflow, they do not rob engine horsepower (although with today's engines this is probably of little practical consequence), and if properly wired, they only run when additional airflow is required, which leads to a quieter ride down the road.
Love also recommends a fan shroud with either fan. Shrouds dramatically improve the efficiency of the fan, and when properly designed they ensure that air is pulled through the entire core of the radiator, not just in front of the fan blades. Vintage Air also always recommends "puller" fans mounted to the backside of the radiator and condenser. History has shown that a puller fan is more efficient than a pusher mounted to the front of the radiator.
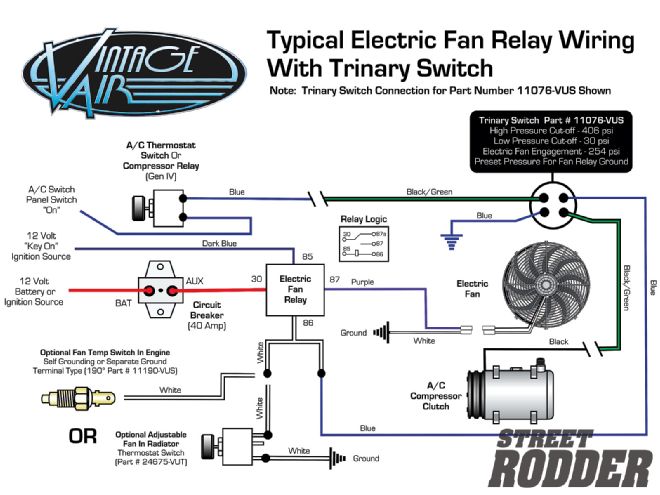
Something of particular importance when operating an electric fan in conjunction with A/C is a compressor safety switch. Love enlightened us on the importance of a binary safety switch. (The use of "bi" meaning two functions.) The binary switch typically is installed in the high-pressure liquid line (No. 6) hose of the system, and provides low pressure and high-pressure protection for the compressor. The switch is connected in a series with the compressor clutch feed from the A/C thermostat (or compressor relay in our Gen IV systems). The binary switch will also open and disengage the compressor clutch if the A/C system pressure builds to 405 psi (usually caused by lack of sufficient airflow through the condenser to remove heat from the refrigerant) to prevent system damage.
If the vehicle is equipped with an electric fan as its primary cooling fan, they recommend a trinary safety switch. (The use of "tri" meaning three functions.) The trinary switch provides the same low- and high-pressure protection as a binary switch, but includes the added feature of an electric fan engagement signal at 254 psi. The correct way to control a primary electric fan would be to have the temperature sensor (set point or adjustable) and trinary switch trigger to the same electric fan relay. Connecting the switch in this manner allows the electric fan to be engaged by either engine temperature or high A/C head pressure.
According to Love, "We never recommend engaging the fan every time the A/C system is on, but prefer to have the system pressure or coolant temperature dictate when the fan is engaged. There is no reason to run the fan when the vehicle is driving at highway speeds where the ram air should provide sufficient airflow through the condenser and radiator."
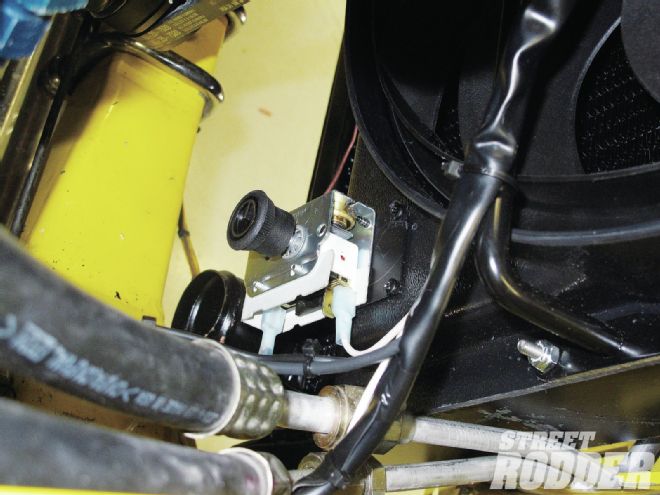
17-18. The Vintage Air Adjustable Fan Thermostat allows engine temperature (180 to 240 degrees) to be set thereby determining when the electric fan will engage. There is a probe that installs into the radiator drain via a fitting.">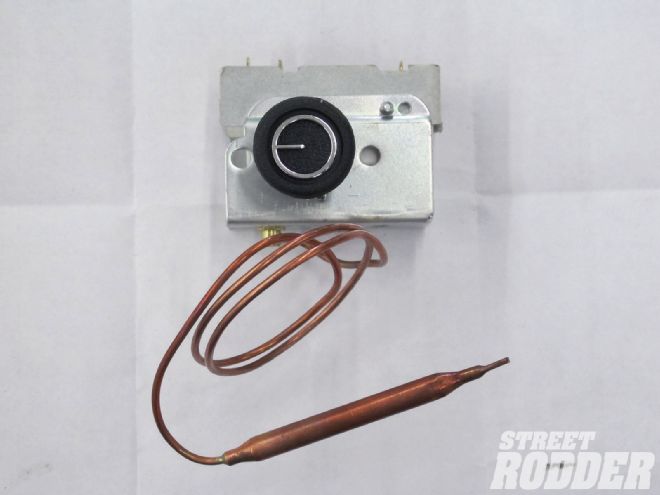 <strong>17-18</strong>. The Vintage Air Adjustable Fan Thermostat allows engine temperature (180 to 240 degrees) to be set thereby determining when the electric fan will engage. There is a probe that installs into the radiator drain via a fitting.
17-18. The Vintage Air Adjustable Fan Thermostat allows engine temperature (180 to 240 degrees) to be set thereby determining when the electric fan will engage. There is a probe that installs into the radiator drain via a fitting.">
<strong>17-18</strong>. The Vintage Air Adjustable Fan Thermostat allows engine temperature (180 to 240 degrees) to be set thereby determining when the electric fan will engage. There is a probe that installs into the radiator drain via a fitting.
17-18. The Vintage Air Adjustable Fan Thermostat allows engine temperature (180 to 240 degrees) to be set thereby determining when the electric fan will engage. There is a probe that installs into the radiator drain via a fitting.">
 <strong>17-18</strong>. The Vintage Air Adjustable Fan Thermostat allows engine temperature (180 to 240 degrees) to be set thereby determining when the electric fan will engage. There is a probe that installs into the radiator drain via a fitting.
Doing a little homework on the right water to use in your cooling system can prevent expensive problems down the road.
Sometimes even the simplest components may be where the problem lies. Water, coolant, and additives are arguably the simplest components of the cooling system but they too must be carefully maintained and watched over. To get the inside on water and coolants we rounded up the answers from our Road Tour partners at AMSOIL Inc.
Changing to straight water engine coolant also comes with a secondary benefit for racing applications: running cooler. Water has almost twice the heat transfer capability as antifreeze, making it the ideal coolant for high-performance street or racing engines. The result is a cooler running engine and higher performance.
But all this good comes with a trade out that leads to the "death" of any street cooling system—water is very corrosive. Water also contains contaminants that cause scales to form and over time these scales have an insulating effect, which reduces heat transfer and causes overheating. Scales only 1/16 inch thick can reduce heat transfer by 40 percent, causing engine overheating and hot spots that result in detonation.
So in order to prevent corrosion and scale buildup, it is important to select the right water. Tap water may be safe to drink, but contains calcium, magnesium, chloride, fluoride, and other materials that are corrosive to cooling systems and cause scale buildup. Well water is even worse. It often contains the same contaminants as tap water, but can also contain sulfate, iron, and silica. These materials can, under some conditions, cause rapid degradation of coolant pH, and severe corrosion and scale buildup.
AMSOIL Inc. has conducted extensive research in the area of straight water engine coolant. Their tests show that the absolute best water to use is reverse osmosis (RO) water or bottled drinking water. This water is purified by passing through a selective membrane that removes all impurities that cause scale buildup. And unlike distilled or deionized (DI) water, RO water is electrochemically balanced. This means that it is stable and won't strip electrons from the metals in your cooling system in order to regain stability, as can happen with distilled or DI water.
In a Temperature Reduction Dynamometer Test, water treated with Dominator Coolant Boost provided a 19 degrees F temperature reduction. It also easily passed the Aluminum Corrosion Test (ASTM D-4340). In the Metal Corrosion Test (ASTM D-2570), which tests corrosion in all metals common to cooling systems, AMSOIL Inc. Dominator Coolant Boost also showed a significantly reduced weight loss.
Dominator Coolant Boost is recommended both for racing applications using straight water coolant and hot rod applications using 50/50 coolant/water mixtures.
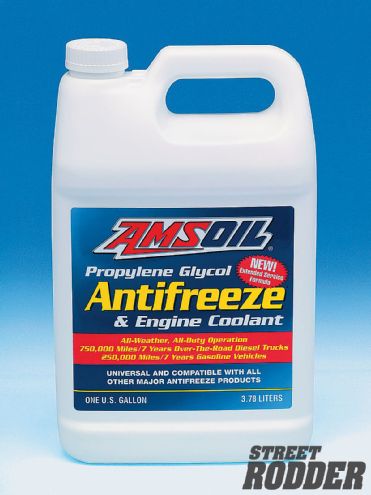
AMSOIL Inc. Propylene Glycol Antifreeze and Engine Coolant is suitable for use up to seven years or 250,000 miles in a hot rod. (Not many of those around!) The new antifreeze/coolant is resistant to corrosion of aluminum, iron surfaces, and solder points.
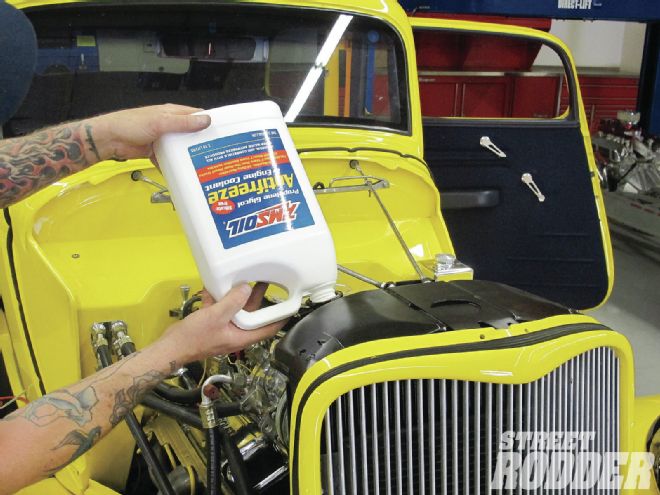
19-21. AMSOIL Inc. antifreeze and engine coolant along with coolant boost were installed in the U.S. Radiator triple-flow radiator."> <strong>19-21</strong>. AMSOIL Inc. antifreeze and engine coolant along with coolant boost were installed in the U.S. Radiator triple-flow radiator.
19-21. AMSOIL Inc. antifreeze and engine coolant along with coolant boost were installed in the U.S. Radiator triple-flow radiator.">
<strong>19-21</strong>. AMSOIL Inc. antifreeze and engine coolant along with coolant boost were installed in the U.S. Radiator triple-flow radiator.
19-21. AMSOIL Inc. antifreeze and engine coolant along with coolant boost were installed in the U.S. Radiator triple-flow radiator.">
 <strong>19-21</strong>. AMSOIL Inc. antifreeze and engine coolant along with coolant boost were installed in the U.S. Radiator triple-flow radiator.
19-21. AMSOIL Inc. antifreeze and engine coolant along with coolant boost were installed in the U.S. Radiator triple-flow radiator.">
<strong>19-21</strong>. AMSOIL Inc. antifreeze and engine coolant along with coolant boost were installed in the U.S. Radiator triple-flow radiator.
19-21. AMSOIL Inc. antifreeze and engine coolant along with coolant boost were installed in the U.S. Radiator triple-flow radiator.">
 <strong>19-21</strong>. AMSOIL Inc. antifreeze and engine coolant along with coolant boost were installed in the U.S. Radiator triple-flow radiator.
Sometimes the overheating problem experienced by our hot rod has nothing to do with the engine actually overheating—maybe it's the gauges. To get some input on the proper installation of gauges and what might be some of the pitfalls befalling a temperature gauge we visited Classic Instruments. We found head gauge guy John McLeod under the hood of his '09 Mopar Challenger Drag Pak car (apparently you can break one of these 6.1L Hemis in the quarter-mile!). McLeod turned us over to the capable hands of Jake Bernthal who had the answers and even some questions we didn't know we needed answers to.
One of the most common questions revolves around, "My temp gauge is reading too high and I know my engine and cooling system are fine. What do I do?" Before you "assume" (that word will always get you into trouble) that the gauge is at fault, Bernthal recommended we check four common causes for faulty gauge accuracy.
Bad gauge ground. Ensure the gauge has a good chassis ground wire attached to its terminal. A bad ground will cause the gauge to use the sender as its ground point and cause the gauge to read inaccurately high.
The sender probe is not completely submerged in the engine's coolant. This is caused when thread adapters are used to convert the sender thread size to the intake manifold or head thread size. The adapter keeps the probe from getting all the way into the coolant. Bernthal informed us that Classic Instruments offers temperature senders with 1/8-, 1/4-, and 1/2-inch NPT standards as well as a 12mm thread for use on GM LS engines. This variation allows you to customize to your applications needs.
Air pockets in the cooling system. This will cause the temperature gauge to read high and then come back down when the thermostat opens and pushes the air pocket past the sender probe. The gauge pointer will continue to rise and fall as the air pocket moves past the sender.
Close proximity to external heat sources. This occurs mostly when the sender is installed in the engine head where it is close to the exhaust. The high temperature of the exhaust can artificially raise the reading of the temperature gauge by 10-15 degrees. If possible, mount the temperature sender in the intake manifold or try shielding it from other heat sources.
Multiple devices connected to the same Classic Instruments temperature sender. Classic Instruments temperature senders will only work with one temperature gauge at a time. Connecting multiple devices will cause both devices to operate incorrectly. For example, if you would like to use two temperature gauges but just one sender you would need to install a switch to isolate one gauge connected at any one time.
Multiple temperature senders connected to one gauge. This happens a lot of times with Flathead Ford engines that could have temperature senders installed on each side. In order to monitor temperature on both sides with one gauge, a switch would need to be installed to switch from one sender to the other (or two gauges could be used, one for each sender). Connecting both senders to the gauge will lower the effective resistance and cause the gauge to read inaccurately high.
Connecting warning lights to a Classic Instruments temperature sender. Classic Instruments temperature senders operated differently than senders designed to turn on a warning light. If a light were connected to the Classic temperature sender, it would most likely not work correctly and would also cause the gauge to be inaccurate.
Another area that can cause a bit of consternation to any hot rod as it can have an impact on both the cooling and charging system are over-driven or under-driven pulleys. The philosophy behind these under-driven pulleys was to help slow down the alternator at excessive rpm encountered during racing. While it works ideally in race applications, the reality is you want standard ratio pulleys on the street.
We happen to need new pulleys for the small-block Chevy that was dropped into our '34 sedan so we visited Bill's Hot Rod Company and selected a matched set of stock black steel pulleys. We weren't interested in the benefits of under-driven pulleys as we wanted to make sure the alternator was producing enough rpm to charge the battery properly and spin the water pump properly to maintain proper cooling.
For the basic street rod you want an alternator pulley ratio between 2:1 to 3:1 as this will ensure a good charging system performance and not over-spin the alternator bearings. The 2:1 alternator ratio will provide approximately 5 to 10 amps output at idle. You find your alternator pulley ratio by dividing the diameter of the crankshaft pulley by the diameter of the alternator pulley. Multiply that number times the engine rpm and that will give you the alternator rpm. (For example, a 6-inch crankshaft pulley and a 2-inch alternator pulley equal a pulley ratio of 3:1; at an idle of 800 rpm multiplied by 3 equals 2,400 alternator rpm.)
Another item recommended by Armstrong of U.S. Radiator is the use of an aftermarket high-performance water pump. On our small-block Chevy we opted for a FlowKooler (PN 1668) high flow water pump (20 percent greater flow over other performance water pumps). The objective here is to move more coolant through the radiator at lower speeds (i.e. traffic) because of the lessened airflow in these types of driving conditions. The result of the efforts of the FlowKooler water pump is the reduction of up to 30 degrees of engine temps, increased pressure in the engine, which helps to reduce ping and improves flow efficiency.
It should also be noted that the FlowKooler water pump through its patented impeller system helps to present the onset of cavitation; which is the formation of vapor bubbles in the coolant. This occurs when the pressure of the coolant falls below its vapor pressure, which in turn lessens cooling efficiencies.
The cooling system is much like the electrics on a street rod—it looks like black magic but it doesn't have to be. A little understanding of the basics and knowing what bugaboos to look for will keep you and your car's cooling system out of trouble.
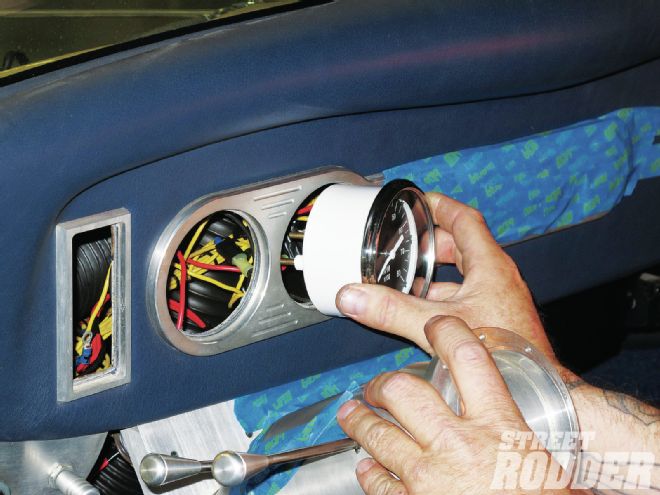
22-23. Classic Instruments Sky Drive and the Hot Rod Series of gauges were installed to freshen up the interior but the water temp sending unit was installed in the intake manifold and not the cylinder head. ">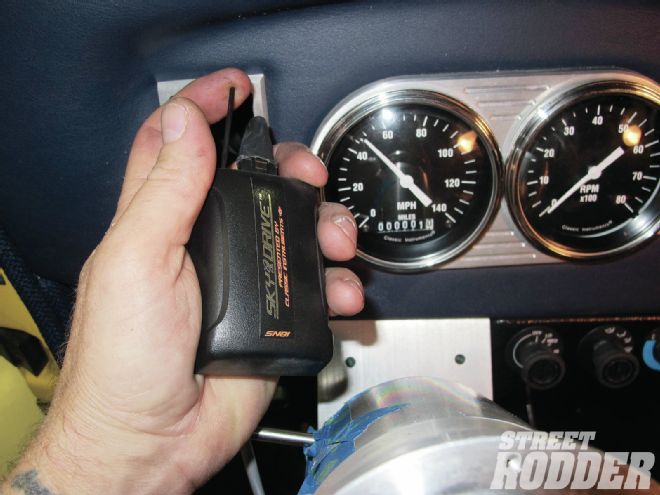 <strong>22-23</strong>. Classic Instruments Sky Drive and the Hot Rod Series of gauges were installed to freshen up the interior but the water temp sending unit was installed in the intake manifold and not the cylinder head.
22-23. Classic Instruments Sky Drive and the Hot Rod Series of gauges were installed to freshen up the interior but the water temp sending unit was installed in the intake manifold and not the cylinder head. ">
<strong>22-23</strong>. Classic Instruments Sky Drive and the Hot Rod Series of gauges were installed to freshen up the interior but the water temp sending unit was installed in the intake manifold and not the cylinder head.
22-23. Classic Instruments Sky Drive and the Hot Rod Series of gauges were installed to freshen up the interior but the water temp sending unit was installed in the intake manifold and not the cylinder head. ">
 <strong>22-23</strong>. Classic Instruments Sky Drive and the Hot Rod Series of gauges were installed to freshen up the interior but the water temp sending unit was installed in the intake manifold and not the cylinder head.
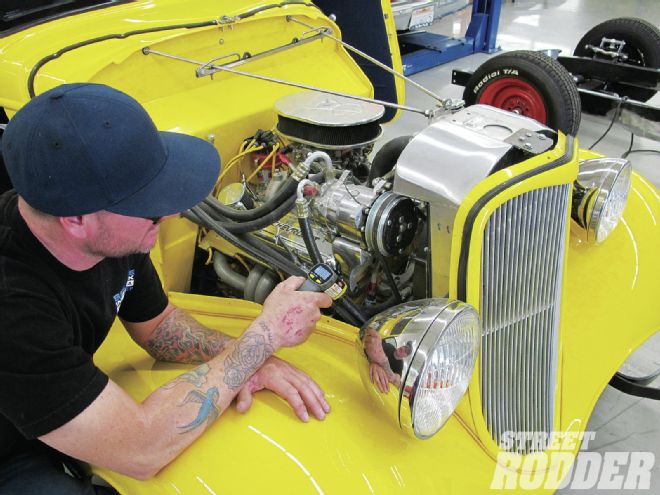
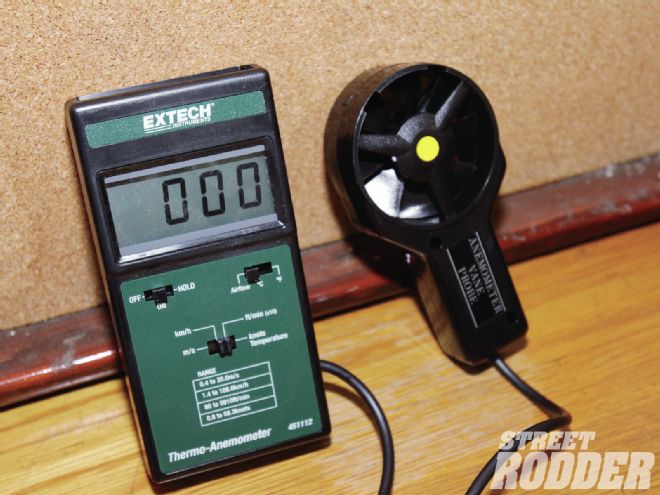
24-25. Don Armstrong of U.S. Radiator uses a gauge capable of measuring the air velocity and air temperature. It is placed in front of the radiator to see how much air the fan is pulling and compare temperatures on either side of the core.">
<strong>22-23</strong>. Classic Instruments Sky Drive and the Hot Rod Series of gauges were installed to freshen up the interior but the water temp sending unit was installed in the intake manifold and not the cylinder head.
24-25. Don Armstrong of U.S. Radiator uses a gauge capable of measuring the air velocity and air temperature. It is placed in front of the radiator to see how much air the fan is pulling and compare temperatures on either side of the core.">
 <strong>24-25</strong>. Don Armstrong of U.S. Radiator uses a gauge capable of measuring the air velocity and air temperature. It is placed in front of the radiator to see how much air the fan is pulling and compare temperatures on either side of the core.
24-25. Don Armstrong of U.S. Radiator uses a gauge capable of measuring the air velocity and air temperature. It is placed in front of the radiator to see how much air the fan is pulling and compare temperatures on either side of the core.">
<strong>24-25</strong>. Don Armstrong of U.S. Radiator uses a gauge capable of measuring the air velocity and air temperature. It is placed in front of the radiator to see how much air the fan is pulling and compare temperatures on either side of the core.
24-25. Don Armstrong of U.S. Radiator uses a gauge capable of measuring the air velocity and air temperature. It is placed in front of the radiator to see how much air the fan is pulling and compare temperatures on either side of the core.">
 <strong>24-25</strong>. Don Armstrong of U.S. Radiator uses a gauge capable of measuring the air velocity and air temperature. It is placed in front of the radiator to see how much air the fan is pulling and compare temperatures on either side of the core.