If you spend any time at all in your garage (and we assume you do), you'll understand the allure of having an epoxy-coated concrete floor: the impeccable appearance, the easy cleanup, and the durable surface make working in the garage a much more pleasant experience. What isn't so pleasant is trying to figure out exactly how to apply the often industrial-usage-intended products, the cost of the materials, and the aggressive chemicals that often make up these floor-coating systems. Some people just use standard gray paint, but even the best paint will peel up, especially when you drag a floor jack over it or roll a car with hot tires on it. UCoat It, based in Royal Oak, Michigan, has made the durable epoxy coating relatively easy to apply, however. The company has developed a simple-to-install, water-based floor-coating system that is affordable and durable, and you can do it yourself.
 Everything you'll need to apply the coating comes in the UCoat It kit. This includes the Part A and B elements of the epoxy paint, the brushes, rollers, roller handle, gloves, work mat/trash bag, stirring sticks, spatulas, safety glasses, installation video, and instructions.
The U Coat It System
The pillar of the UCoat It floor-painting system is its water-based epoxy coating called UCoat. Using water as the basis for the epoxy makes it easy to apply and simplifies cleanup. UCoat It has done its homework, so the floor coating is extremely durable, to the point where the company offers a lifetime warranty against peeling and lifting, including hot tire pickup.
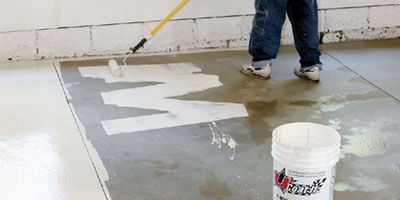
The best example of the UCoat It system's simplicity is how the epoxy basecoat is applied. First, thoroughly rinse your floor of dirt and debris with high-pressure water while checking closely to be sure water is absorbing evenly throughout the surface. Grease, oil, and other contaminants will cause the water to bead on the surface, and these areas should be thoroughly cleaned using USolv degreaser. After cleaning these problem areas, dilute 10 percent muriatic acid in water, brush it over the area, and thoroughly rinse it off. Now, start the painting process by wetting the floor thoroughly with water. While the floor is still wet, pour both cans of the two-part epoxy into the provided UCoat It bucket (Part A first, then Part B). Mix it up and roll the first coat onto the floor. Don't be surprised if the first coat looks a little uneven; it's soaking into the concrete to provide a bond with the concrete-the finish coat will look a lot better.
Once the first coat is dry, usually in five or six hours, mix the finish epoxy paint and roll it over the first coat. You can stop there or add a high-gloss decorative flake topcoat called UFlek, which gives the floor a different appearance. UFlek flakes come in various mixes (you can see them on the UCoat It Web site color simulator) and are applied on top of the second coat while it's still wet. After the second coat of paint is dry, roll on the UGloss-AF clearcoat to seal the floor from solvents, impacts, and other potential damage.
The UCoat It system is perfect for the do-it-yourselfer. It's easy to apply, should outlast you, and transforms your dingy garage into a Nextel Cup-looking shop. Now you just need all those cool tools!
Top Three Epoxy Floor-Painting Tips
1. Remove everything from the area being coated.
It's a pain in the butt, but clearing everything out of the garage is key to ending up with a high-quality epoxy-coated garage floor. We filled a 26-foot enclosed trailer with the contents of this garage for a total of four days to complete the floor.
2. Be Honest About The Condition Of The Concrete.
If your concrete garage floor is seriously old and abused-like it shows signs of distress over the entire surface-coating it will only improve the appearance so much. Like painting a car with dented, rusty, and otherwise abused sheetmetal, the paint job is not going to look that great. If your concrete is bad, consider spending the money to replace it (as was done with this garage for a cost of about $2,000).
3. Use The Broom Handle To Extend The Roller Handle.
You'll need to buy a new, clean broom to wash the concrete floor, so make the purchase worthwhile-screw the broom handle onto the paint-roller handle to make it easy to apply the epoxy paint.
So What Does It Cost?
The UCoat It system is designed to meet different budgets and needs. With that in mind, here are the three most common combinations and the general costs for doing a 211/42 car garage.
Product Description And Estimated Cost
UCoat two-coat epoxy coating$249.95
UCoat with UGloss-AF (two coats of epoxy and a UV clearcoat)$459.90
UCoat with UFlek-AF (two coats of epoxy, flakes, and a UV clearcoat) $484.90
Support Items
Usolv $5.95
UPatch$44.95