There are certain things in the car building world that are considered black arts- jobs that seem to require mystical powers to accomplish. Making headers is one of those jobs. This month, we stepped into the void and attempted to make a set of headers in-house. In last December's issue, we chronicled our experiences at Lincoln Electric's welding school, where we got a solid foundation in the basics of TIG welding. We certainly put our skills to the test with this job, too. No one will ever call what we made a masterpiece, but we learned a whole lot during the process. The next set of headers we make might actually end up on a car.

The Premise
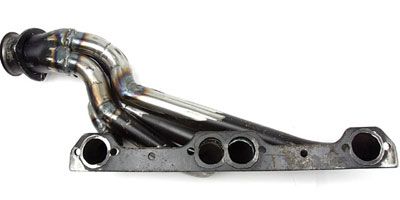
This may seem overly "green" of us, but we decided to do some recycling this month. Though you will never catch us in Birkenstocks and hemp tunics, we do find many occasions to adapt or re-use old parts. Not so much to save the planet as to save our wallets. With that in mind, we attempted to build a set of custom exhaust headers from two pairs of old ones we had lying around. The goal was to make them work in a front-mounted turbo application. We started with a pair of 1 51/48-inch shorty headers, mounted them to the block, and decided on the best place to drop the turbocharger.
Mock-Up
Routing all the plumbing for a turbocharger can get really complicated, so in an effort to keep things simple, we decided to hang the turbo in front of the engine, just behind the radiator. This allows room for an air inlet duct and plumbing from the turbo to an intercooler. We flipped the headers upside down so all the tubes faced forward. Then we stared at if for a while trying to think of what to do next. To better visualize how everything should be routed, we cut the collector off using our 14-inch chop saw. Then, we rigged up a bracket out of scrap steel bar to support the turbocharger. We secured the bar with clamps, suspended the turbo with zip ties (use strong ones), and bolted the collector to the bracket.
Filling Holes
Welding is all about managing heat. You have to get the base metal hot enough to liquefy and join with the molten filler material, but not so hot as to burn right through it. This can be a very delicate balancing act because different areas of the same workpiece can require different techniques. Edges are especially susceptible to burning through because there's less of a heat sink at the edge than in the middle of a panel or tube-heat is more concentrated at the edge because there are fewer places for it to go. So, a heat range that will make a nice-looking weld on the middle of a panel can blow right through when you come to the edge. One way to fill a hole is to build up the surrounding area with extra filler material one pass at a time until you've created enough of a "bridge" to close the gap. To prevent creating holes in the first place, back off the heat as you come to the edge of a panel if you're using a TIG welder. With a MIG machine, you may want to stop the bead before you reach the edge, wait a few seconds for the weld to cool slightly, and add a couple of tack welds to finish.
Lessons Learned
*Clean the weld areas thoroughly. The wire brush on our angle grinder did a pretty good job of cleaning the rust and old paint off the header tubes, but it still left stuff behind. Any oils, paint residue, or rust can cause scaly, porous welds. In an exhaust system, this can cause blowouts, but in a structural piece, like a rollcage, it can cause total failure at that joint. Take the extra time to clean all the joints until they are shiny. The pros use separate grinding wheels and wire brushes for the different metals they are working with.
*Make your joints as square as possible. It's much easier to weld two pieces of metal that meet together with no gaps between them. Take extra time figuring out the angle you need to cut to make the pieces fit flush.
*Use smaller bends to make better transitions. You don't have to admit it to anyone, but look at how some of the import guys make their exhaust systems. Some of them use nothing but straight pipe cut into hundreds of pieces at really shallow angles to make all the bends in the system as it travels from the headers back. That would involve a lot more welding that even the average enthusiast would want to tackle, but for headers, especially in a naturally aspirated application, make all your as bends smooth and gradual as space permits.
*Test your heat settings on scrap pieces first. It's less annoying to blow holes through junk tubing.
*Practice your technique. It takes a lot of practice to make good-looking welds. Practice as often as you can.
How The Pros Do It.
We talked to the guys at Stainless Works, no strangers to making custom headers for unusual powertrain combinations. When faced with a one-off application, they start by bolting a flange to the exhaust ports, and mount the collector where they want all the tubes to meet. Then, they rough in the overall shape using straight tubing cut at angles and tack welded together. Once this "template" is complete, it's taken over to a machine called the Romer that scans the pipes and determines proper mandrel bends needed to assemble the header.
Stainless Works' Scott Harrison says they feel that this is the best way to design a set of headers from scratch. When you have a starting and ending point, it's just a matter of cutting the bends, and welding everything together. Stainless Works sells "you-weld-it" kits for a variety of applications for the guy who wants to build his own headers, but isn't interested in blazing new trails. Harrison also recommends that when you are planning to make your own headers, use stainless steel if you can afford it, whether or not you buy it from them. "It's a very time consuming process, and you want them to last once they're done," he said. We can attest to that.
Though not entirely successful, this was ultimately an exercise in welding something real. Recently, we've gotten some readers' email expressing concern of the tone of some of our "make-it-yourself" articles. Some readers may have gotten the wrong impression-we do not mean to imply that if you don't build every square inch of your car, you're not a true car crafter. Our intention all along is to show that there are a lot of things you can do yourself. It takes a lot of practice, but this is all stuff anyone can learn to do if they want. And the benefits are satisfying-you're constantly learning new skills, and you can stand to save a lot of money, too.
In addition to our chop saw, TIG and MIG welders, we could not have done this work without these additional tools. A good bench grinder is an absolute must. We used the wire brush attachment to clean up the areas to be welded. We also liked the electric angle grinder behind it. With a 36-grit flap disc attached, this thing removes a ton of metal in a hurry. Be careful not to grind through any areas like we did! Also essential was the right-angle attachment on our other bench grinder. We used that to true up any odd stuff left behind by the chop saw. If your can swing it, these locking pliers and a set of copper strips are also very helpful, though not necessary. Especially considering when tack welding sections of tubing together, you'll wish you had about six extra hands. The Eastwood Company sells these locking pliers specially made to hold tubing in place. The copper strips, also available from Eastwood are very useful when filling holes. Molten steel doesn't stick to copper, so you can back up a hole with one of these copper plates and weld until the hole disappears.
To make the headers we used a TIG welder almost exclusively for welding the tubes together, mostly because heat is easier to control than a MIG. You can use a MIG welder, however your weld beads will be larger than with a TIG machine. For both welding processes, we used ER70S6 filler wire, but we used pure argon as the shielding gas during TIG welding, while the MIG torch was blowing out a mixture of 75% argon, 25% carbon dioxide-standard stuff for welding mild steel.
You don't need a lot of heat when welding tubing. We had the TIG welder set at about 35 amps for most of the job, while the MIG worked best on it's lowest heat setting.