
Liquid-ink transfer—or hydrographic printing—isn’t a new idea. Many companies have used it for years on items such as laptop and iPhone cases. One of the providers of industrial hydrographic printing equipment, Liquid Print, recently started a subsidiary called MyDipKit that offers, you guessed it, kits for guys like us to use in the garage. If you can use a spray bomb and have a bucket of water, you can learn to do liquid-ink transfer. The catch is the learning.
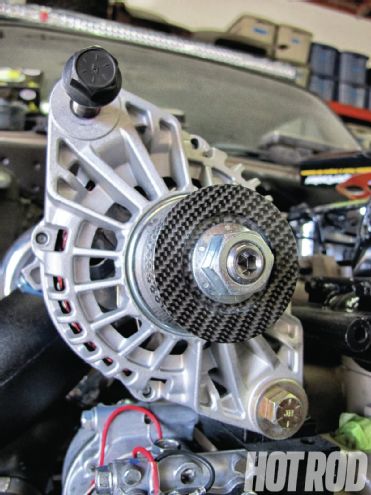 <strong>01. </strong> If you read Diesel Power magazine, you might notice something odd about Project Doomsday Diesel’s alternator pulley. That’s what they get for sharing a garage with us. The gray-colored squares are actually clear on the ink—it’s the gray basecoat shining through. With the recommended layers of clearcoat and colored basecoat, the final result has paint dimension and a quality appearance.
It requires 30 hours of training to execute the process on an industrial level. It took us about three times of trial and error before we got our small piece right. Every time we encountered a new problem, we watched MyDipKit’s free online videos to find a solution.
The kit we tested included one of the 130 different available designs of ink paper. Among the choices are airbrushed skulls, American-flag patterns, camouflage designs, and so on. The paper dissolves on the surface of water when a spray-on chemical activator is added. The process involves dipping the part at a 30–40 degree angle through the paper and into the water. The paper design will appear to jump from the water, attaching to the surface and etching itself to the item. If you have a part that paint will stick to, and if you can fully submerge it in water, you can dip it.
One of the biggest advantages of liquid ink over a vinyl wrap is that, when done right, the design will contour to sharp angles and complicated shapes without distortion. Other than the application process, it acts like paint. It uses real paint for a basecoat and real clearcoat; a can of each comes in the kit. When finished, the ink will withstand tremendous amounts of heat, according to marketing manager Nathan Logue, but “that’s with a complete understanding of clearcoating. It can take some experience.”
In our tech center, which we share with other magazines, we grabbed the alternator pulley being used on Diesel Power’s Doomsday Diesel project and dipped it using the carbon-fiber pattern (yeah, most guys hate fake carbon fiber…why do you think we used someone else’s parts?). After finally getting the pulley right, we couldn’t resist the opportunity to add a totally random wooden pattern on a diff cover. Our first attempt at laying a large piece of ink paper didn’t work so well. The paper folded together and sunk in the middle, causing a line down the middle of the pattern. We jumped online and immediately discovered what we did wrong, corrected it, and dipped again.
 <strong>02. </strong> Some guys laugh at it and others ask why. MyDipKit offers patterns for legit-looking things like marble and stone, a wide range of camouflage, illusion patterns, and so on. This is the wooden pattern on a late-model Mustang’s rear differential cover.
Nathan says some of his customers become addicted to the kit, and we can see why. It’s fun. The kit we tested came with everything you need apart from scissors, including face masks, gloves, scuffing pads, ink paper, activator, clearcoat, and basecoat (that matches your pattern). Our kit cost $99 and included 1.5x6 feet of material.