
Before we print another word about the aircraft-inspired components Frank Wallic makes, we have to come clean on something: We've only been giving you half the information we should have been giving you all along.
It's because we got all wrapped up in the very idea of Frank so very generously revealing his tips and tricks. In repeating these techniques, we fooled ourselves into thinking we were upholding some sort of editorial integrity. But, all we were doing was riding the guy's coattails, and it's all on account of tools.
You see, whereas fabricators like Frank can justify investing in box-and-pan brakes, motorized bead rollers, and pneumatic flange shrinking/stretching tools, some of us can't. Those exceedingly expensive tools make him money on a daily basis, but to a lot of us they would only take up shop space the other 364 days of the year that we didn't use them. By showing you how he uses those trick tools to make those parts, we're merely teasing you. After all, if your shop was outfitted with those tools, chances are you'd already have the knowledge to make those parts. Heck, even if you had the dough to buy the machines, you probably wouldn't be putting yourself out trying to make the parts yourself. You could afford to hire a pro like Frank.
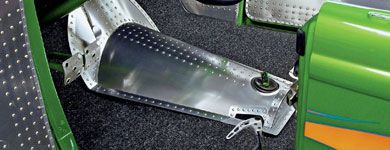
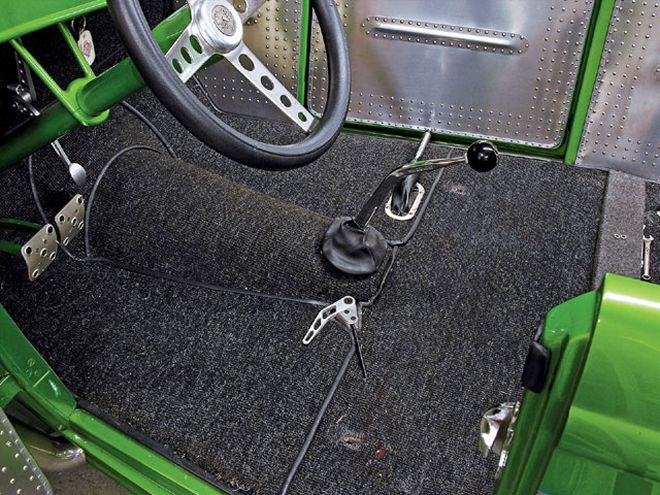 The car for which Frank made this trans tunnel isn't just another Deuce; it's the Limefire-inspired car that Dave Lane built for George Poteet. As nice of a car as it is, it's a little bit plain with all of that conventional upholstery (anyway, Pete Chapouris' real Limefire had a tin interior, so it made a little bit of sense to rip out the soft stuff).
What we should've been doing all along was offering alternative methods to make these parts by improvising with ordinary tools. Now that would've been a contribution. So, in feeling slightly guilty for dropping the ball, we took it upon ourselves to show a few low-buck, down-and-dirty tricks.
Naturally, there are pros and cons to these methods. On the upside, their essence date back to the Bronze Age: We're just bending, shrinking, and stretching metal. In practicing these methods, you're following in the same footsteps of the craftsmen who bodied Classic Era cars like Duesenbergs. Even if the exotic counterpart tools existed at the time, you can bet coachbuilders in postwar Italy didn't have access to them when they crafted the bodies for highly exotic cars like Ferraris.
Now for the downside. As steeped in tradition as these quick-and-dirty tricks are, Mittler Bros. isn't nervous that it'll lose sales. These methods are rather crude, require a lot more physical effort and time, and they often compromise the surface finish of the materials. Depending on your perspective, it's rough or charming. I'm a bit of a romantic with a soft spot for the quirks that define handmade objects, so I'd say it's the latter. I'm also cheap, and budget plays a huge role.
 Since the existing trans tunnel fit well, Frank simply copied it verbatim. The lines scribed in the panel represent the bend points for the tunnel's flange. If creating one from scratch, trim the template to reflect the shape it needs to cover. When transferring the shape to the desired material, add an additional inch or so for the flange.
To showcase these methods, I'll offer my low-brow alternative after each of Frank's "proper" methods. For demonstrative purposes, I used some really cheap 22-gauge aluminum sheet from the local hardware store. At only 0.025-inch thick, it's less than half of the 0.063-inch material that Frank uses. While it forms with less effort than the thick stuff, it isn't necessarily any easier to use (a hard sneeze will mangle the stuff). In fact, to see if these sorts of processes are within your abilities, I'd highly advise practicing on the really cheap hardware stuff first. At least you can learn the fundamentals without totally wearing yourself out or wasting thick and expensive stock.
It goes without saying that these methods aren't for everyone. I, for one, wouldn't even consider doing these things had I a garage full of the "right" tools. Then again, there's probably no better way to learn metal's wily ways than by using plain ol' Armstrong tools on it. At the very least, it's a great excuse to hammer on things.
Torch-Annealing Aluminum
Aluminum is, without a doubt, considerably easier to form than steel. In fact, it's downright easy to bend. As easy as it is to work, all off-the-shelf aluminum sheet except dead-soft 1100-O can be rather stiff if you really need to move it around and you don't have powerful tools like Frank's. It's because the quenching process used to manufacture aluminum sheet hardens the material considerably.
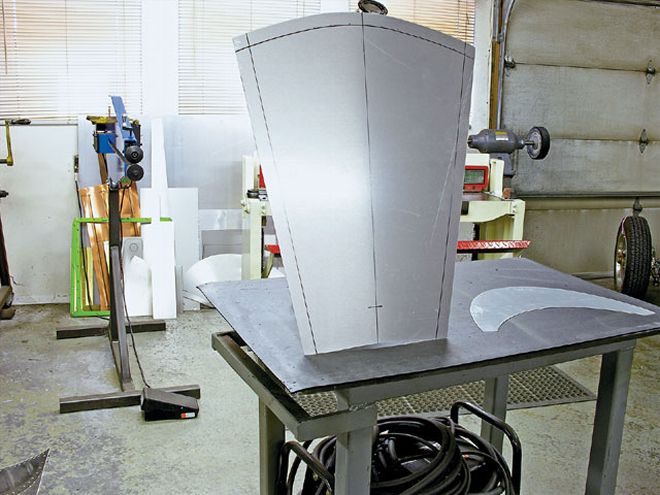
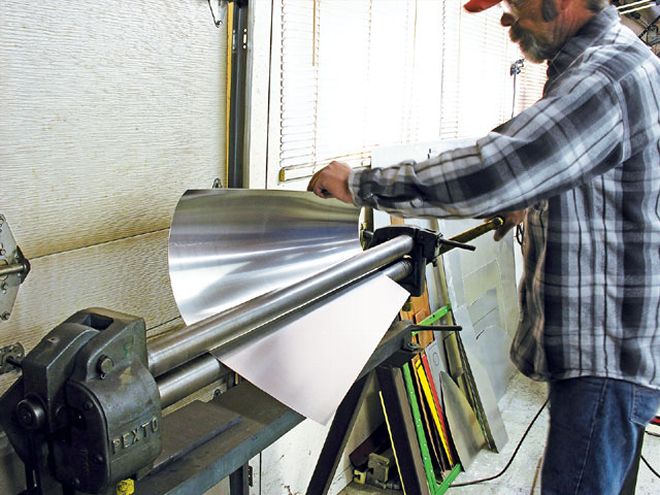 Frank used a vintage Pexto slip roll to form the arch into the tunnel itself. Since each end of the tunnel has its own radius (tighter for the smaller end), Frank set the machine up with a taper so the material would more or less fan out.
Furthermore, bending metal at low temperatures-even 1100-O-tends to work-harden it. For a good example of work hardening, bend a paper clip back and forth a few times. It'll get really stiff and eventually break. The same thing happens to aluminum. In fact, the powerful tools that Frank has can very harden the material. Once it hardens, it's only a matter of time until it cracks.
Luckily there's a solution: annealing. And, guess what? It can be low-buck, too. Aluminum anneals incredibly easily. All you have to do is heat it to roughly 650 degrees Fahrenheit and let it cool slowly back to room temperature.
The trick is to reach that temperature without overheating the metal. It's because aluminum heated to 1,200 degrees will melt, and at that point the extruded material becomes a cast material, and cast materials have very poor yield properties.
The more legitimate means is to coat the material with a temperature-indicating stick, or T-stick. They turn colors or burn away when they reach their indicated temperature. They're inexpensive and available at most welding supply shops, and those sticks are probably the best way to anneal aluminum if all you have for a heat source is a small propane or Mapp-gas torch.
 I don't have a Pexto. I do have an old Ford axle bell, though, and it has an uncanny taper much like the trans tunnel. Bear in mind that this bell has a radius that's far too small for the size of tunnel Frank needed to create. In this application's case, an old gas bottle might offer a suitable radius (just use less pressure for the gentler radius).
But, if you have a plain ol' acetylene kit, you can use the carbon deposit from an acetylene-rich flame as your indicator. It's because those carbon deposits burn off at about 650 degrees Fahrenheit, and it works really well on thicker, non-hardening materials like the 1100- and 3003-series 0.063-inch aluminum that Frank advocates. Bear in mind that it's possible to torch-anneal thinner materials; however, it's extremely difficult to do without localized overheating. Similarly, it's possible to anneal hardenable aluminums, but they tend to be trickier to shape.
Tuck-Shrinking Aluminum
As just about any novice panel beater has accidentally learned, a few quick hammer-on-dolly blows can stretch a body panel beyond recognition. Those same students can also bear testimony to how difficult it is to shrink that metal back into its original shape. In fact, shrinking metal can be one of the more bothersome tasks to a novice metal-shaper. Making it all the worse, there are occasions that require pretty extreme shrinking processes. Take the angled strip that connects the transmission tunnel to the rear plate. Frank shrunk the lower flange considerably to achieve that radius.
While Frank used his Lancaster-type shrinking tool, it goes without saying at this point that there's a shade-tree means to shrink metal. Probably the simplest means is called tuck shrinking.
In a nutshell, after folding the metal into a "pucker," you hammer the pucker into itself. If done carefully, the puckered area will gather ever so slightly. By making the panel thicker in that area, the metal actually shrinks laterally. If that shrinkage is in a flange, the panel will bow just a teeny bit. Naturally, many small shrunken areas in a flange add up. And when they do, the panel bows considerably.