Well, our 500-inch Wedge looks impressive between the fenders of our '68 Cuda, but how will it run? We were shooting for some low-nine-second timeslips, so read on and find out if we achieved our goal.
In last month's "Wedged to the Max, Part one" article, we assembled the parts and built a 500ci race wedge to be installed in our '68 Barracuda drag car. We were shooting for some low-nine-second timeslips from our somewhat hefty A-Body and knew that it would take a well thought out combination to achieve our goal. Remember, the biggest limitation of this build is the stock, two-bolt main, 440 block. We toughened up the bottom end with a Chenoweth main girdle, but we're still going to limit our shift points to around 7,000 rpm and go through the traps in the quarter at around 7,300 rpm until we install the second feed line of our dual-line oil system. We plan to race this car nearly every weekend and plan to freshen the motor only once each season so our combination needs to be durable. we completed the engine build in last month's issue, but we were pressed for time to make Florida's winter bracket series so we planned to tune the motor where it would feel at home-the track. This is a somewhat old-school approach as engine dynos seem to be the way of the future, but in this issue we'll show how track tuning can be just as effective as dyno tuning and a lot more fun.
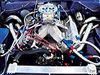
After final assembling and priming our long-block, it was time to drop our wedge into the engine bay. Once off the stand, we installed our SFI-approved flexplate and marked it to properly install the torque converter bolts. Remember the converter bolts only line up with the flexplate one way, so marking it with paint early will keep the trial and error down later. The center link of our car's steering system also needed to be removed to install the engine. This is a back-half car that still retains its stock suspension up front, so the only way to get a rear sump pan in is to have the steering link pass through it. Yes, this is a hassle when pulling the engine, but the advantage of a rear sump oil system in a drag car is well worth it. For exhaust, we're using Hooker's Super Competition fenderwell exit headers. The primary tubes of these headers are a little longer than we'd like, sacrificing some horsepower, but the only other option is to go to expensive custom-built units, and our budget won't allow that. The nice thing about the Hooker headers is the fit and finish are great. Even with Indy SR heads, which have raised exhaust ports, no modifications were required to install the headers.
With the long-block bolted to the transmission, and the motor plate mounted securely to the framerails, we had a couple of new items to fit into our engine bay. First, a Moroso crankcase vacuum pump and the associated hoses, hardware, and evacuation tank was installed. We mounted the pump on the driver-side motor plate, had our Indy valve covers welded up to eliminate the breathers, and had a dash 12 male AN-style fitting welded to the driver-side cover to feed our evacuation pump. The other side of the pump is routed to the evacuation tank, which we mounted to the driver-side inner fender. The evacuation pump kit comes with multiple V-belt pulleys that can be used to adjust the rpm that the pump turns; we will initially run ours at one-half crankshaft speed as the instructions with the kit suggest. We also installed Moroso's adjustable vacuum relief valve to regulate our crankcase to four inches of vacuum as a baseline. There are several advantages to running a vacuum pump on a motor like this, but the biggest advantage is it allows the use of low-tension compression rings. The crankcase vacuum helps seal the rings to the cylinder wall, freeing up horsepower through the reduced friction of the rings against the cylinder.
Next, we installed Flex-A-Lite's new aluminum radiator that incorporates versatile fins or heat sinks on the outside of the tanks. This revolutionary design not only helps the efficiency of the radiator, but the design of the heat sink fins gives infinite locations for mounting the radiator and accessories like cooling fans and transmission coolers that are normally located on or near the radiator. Remember, this is a bracket car, and we want consistent performance. Being the quickest car in a bracket race does give you a couple of advantages, but being consistent wins races. A quality radiator helps cool the car quicker between rounds, allowing for a consistent engine temperature even in the late rounds when there is not much cool-down time available. Consistent engine temperature is important for consistent elapsed times, a necessity in bracket racing.
Once everything was installed and double checked, we filled the fluids and fired the engine up for break-in. Since this is a roller cam motor we don't need to perform the normal twenty-minute cam break-in cycle, we just need to build some heat in the motor to seat the rings and check for leaks. Also, our Crane camshaft installation card specifies to set the valve lash when the engine is hot, so we'll accomplish that just after break-in. Our engine fired immediately, and we set the ignition timing to a baseline of 36-degrees total advance and set the idle mixture and idle speed on the carburetor. We still weren't sure how it would perform at the track, but this thing sure sounded healthy. Nothing gets our adrenalin pumping like the cackle of 500 inches of a 13-to-one compression big-block singing through open headers. Before we took it to the track, however, we had to finish our work at the shop. After tuning the carb, setting the timing, and allowing it to come to temperature, we gave the throttle a couple of whacks to make sure everything sounded ok and then shut it down to set valve lash and change the oil. We always drain the engine oil after break-in, taking a sample to look for any foreign material and cutting open the oil filter to check the element for excessive metal particles. All we found was a small amount of fine bronze dust, which is normal for a new bronze geared intermediate shaft breaking in on a billet roller camshaft, so we deemed the engine healthy and headed for the track.
Any professional racer will tell you the key to winning drag races is consistency. The same goes for tuning a car at the track. The data you collect by making passes down the drag strip means nothing unless the car is staged consistently, shifted consistently, and driven down the same lane accounting for changes in the weather as you test. Also, if the car isn't hooking up properly each pass, your data will be skewed, so any traction issues should be resolved prior to making tuning changes.
For our testing we went to the Lakeland Drag Strip to make some shake-down passes. We're fortunate here in Florida to have several area drag strips at our disposal for racing and testing. every week a drag strip in the United States shuts down permanently, and only half as many new tracks open. If we don't support our local tracks we may eventually be forced to pay $750 a day for dyno time to tune our engines instead of the $12 it cost us to make as many passes as we wanted on a Thursday night at our local track. we encourage our readers to head to their local drag strip and have some fun. Believe it or not, drag racing, not sitting in a parking lot with lawn chairs, is what these cars were designed to do.
On our first pass down Lakeland's eighth-mile we wanted to seat the clutches and bands in our fresh transmission and make sure everything felt good and worked correctly, so we limited our right foot's travel to about one-third throttle. The resulting 6.90-second elapsed time had us encouraged that this combination had potential to achieve our goal of low nines in the quarter. With everything working correctly, we made a full throttle, just over half-track pass that resulted in a 6.26-second elapsed time and a stout 1.32-second wheelstanding 60 foot time. Back in the pits we pulled a spark plug and saw that it was nearly snow white, so a jetting change was in order. When jetting we step up or down in increments of two until we are close, then fine-tune by making jetting changes of one size at a time. With 92 jets in both primary and secondary metering blocks, we made our first full pass running a 6.04-second elapsed time at 114 mph. Technically, this equates to a 9.48-second quarter-mile, so we did reach our goal, but we knew we had more in it. By richening the jetting further, the car responded with quicker elapsed times and higher mph until stabilizing at an e.t. of 6.00 at 115.5 mph with 97 jets in both ends of our King Demon. We then bumped the ignition timing up four degrees to 40-degrees total advance and ran our quickest elapsed time of our test night at 5.98 seconds at 116.8 mph! This equates to a quarter-mile e.t. of 9.38 seconds, putting us solidly in the low nines. Always remember that weather changes will change the power your engine makes. Cooler temperatures and higher barometric pressure will improve the output of your engine; weather needs to be tracked and considered when tuning. Our weather stayed consistent throughout our test session, so we were sure our improvements were due to our tuning changes and not improving atmospheric conditions. Our test time was running out for the night, but we were comfortable our tune-up was now much closer than when we started, and reading the spark plugs verified that our mixture was now in the safe zone of enrichment, so we decided to call it a night.
Remember that we're limiting our rpm to 7,000 until we can install the second oil feed line to our oiling system, and our camshaft actually makes power up above 8,000 rpm. Once our oil system is complete, we will certainly shave some elapsed time by raising our shift points closer to 7,500 rpm. We will also add more ignition timing to the engine as it responded well to our first increase in timing. Our rule of thumb is to add ignition timing until no further increase in performance is seen, or until the engine begins running noticeably warmer (an indication of detonation) during a pass down the track. Our engine was happy and responded well to 40-degrees total advance, so we'll bump the timing again during our next test session. This may seem like a lot of ignition timing, but remember unless you have checked the tab on your timing cover for accuracy the numbers are somewhat ambiguous. We checked our tab during assembly when we were degreeing the camshaft and found it to be some four degrees off true top dead center, so our 40 degrees of advance is actually only 36 degrees. Optimum ignition timing varies widely from engine to engine and is dictated not only by compression and fuel octane, but by cylinder head and piston design, weight and gearing of the vehicle, and other variables. We always begin at around 36-degrees total advance on aluminum headed big-blocks and adjust to whatever makes the car run quickest without overheating.
So there you have it, our 500-inch wedge accomplished the goal we set of low-nines in our nearly 3,100-pound Barracuda. We will experiment later with more tuning and induction changes to try to improve our combination, but for now we're just going to race it. after our initial testing session we entered the Southern Nostalgia Nationals at Lakeland Motorsports Park and won our class both days of the two-day event! The following weekend we entered the Georgia Southern Bracket Nationals where we went several rounds each day among a field compiled of 90-percent dragsters (which in our opinion are purpose-built race vehicles, not cars) driven by the best bracket racers from around the country. The first race we'll enter at a quarter-mile strip is the Snowbird Nationals in Bradenton, Florida, and we'll keep you posted as to how we run at that event.