It’s the classic car reality: the beloved ’60s muscle car from high school rusting away in a field. This was the sad truth of our ’67 Firebird—that is, until the day we rolled it into our new shop and began the journey of getting it back on the road.
Having recently replaced the floorpan while documenting the story for HPP’s sister publication Car Craft, the trunk pan was next on the list!
Most restoration projects are learning experiences, and we learned a great deal with this install
There are two options for dealing with trunk floor issues—repair or replace. Both have their pros and cons. Installing a mid-section patch panel is far easier and quicker than doing a full trunk-floor replacement, but we opted for the full-replacement piece as we are doing a complete restoration and are already replacing major panels, including quarter panels, the taillight panel, and the roof. After seeing the incredible result of doing a full floor-pan replacement on this classic Poncho, we viewed a full trunk pan replacement as a logical step.
 <strong>1.</strong> If the trunk lid has been removed from the car, reinstall it, then check, measure, and document the gap between the edges of the lid and the outer dimension of the trunk jam. If using a new trunk lid, use that one for this step.
Dynacorn’s full trunk floorpan (PN 1046B; $327.47) is tooled from modern automotive-grade alloy, not a universal-grade steel like many patch panels. The alloy is elastomeric, so it bends without losing strength.
Dynacorn says it’s selling as many full trunk pans as trunk patch panels because as Firebirds are becoming rarer, restorers are taking on bodies that are severely decomposed.
The install required basic welding, cutting, and mechanical skills. With a plasma cutter, a TIG welder, a drill, chisels, hammers, welding clamps, and help and advice from some friends (Jennifer LaFever, Jasen Taylor, and Terry O’Hara), the process went smoothly.
Knowing that it’s critical to support the unibody F-body at the right locations so the structure of the vehicle is not altered, we removed the Firebird’s rear end, and supported the vehicle on four Craftsman 3-ton jackstands, placing one jack at the front and rear of each framerail. The front subframe remained on the car.
It’s a good idea to take photos from many different angles, and we followed this rule from the beginning to the end of the project. This way, once it was going back together, if we had a question as to how something fit, we referred to the photo. We took our time with this step and were very thorough.
We followed two other rules throughout the project. We double-checked our measurements, and we retained the cutaway parts until the install was completed. It’s handy to have them to refer to if needed.
Years of hard driving, burnouts, and the occasional accident will stress and stretch the body. As panels are cut apart and as stress is relieved from the metal, things start to move. We welded in braces across the interior of the vehicle when installing the floorpan. We left them in place and added additional bracing from the wheelhouse to the trunk jam for the trunk-pan install.
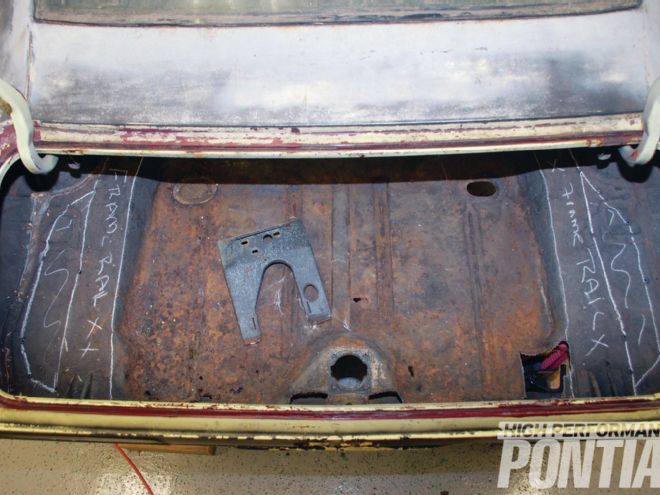
The rust was confined to the gas-tank area, but it’s hard to know exactly what you have until you start cutting. Once the main-trunk-pan layer was peeled back, it was easier to see the extent of the compromised metal.
We marked the framerail areas in chalk. It’s essential to keep the framerails intact. The easy way is to create a guide on the top surface by getting under the car and either plasma piercing or drilling a series of holes around the framerails, leaving ¼-½-inch between the hole and the edge of the rail. We had cut off the taillight-panel support bracket and put it aside for use on the new trunk pan.
2. We took measurements of the trunk, and then drew two simple diagrams of seven different dimensions across the trunk area, as shown here. ">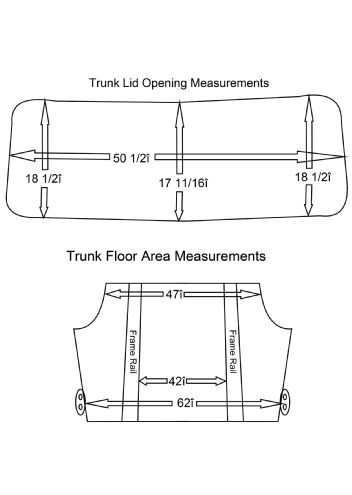 <strong>2.</strong> We took measurements of the trunk, and then drew two simple diagrams of seven different dimensions across the trunk area, as shown here.
3. We compared the old trunk pan to the new one, and took note of all the braces, mounting brackets, and anything attached to the old trunk floor, like these shock-absorber mounts and the driveshaft bumper (not shown). Anything not on the new piece will need to be removed from the old trunk pan and reinstalled. We marked these areas so they were not damaged when we removed the old floor.">
<strong>2.</strong> We took measurements of the trunk, and then drew two simple diagrams of seven different dimensions across the trunk area, as shown here.
3. We compared the old trunk pan to the new one, and took note of all the braces, mounting brackets, and anything attached to the old trunk floor, like these shock-absorber mounts and the driveshaft bumper (not shown). Anything not on the new piece will need to be removed from the old trunk pan and reinstalled. We marked these areas so they were not damaged when we removed the old floor.">
 <strong>3.</strong> We compared the old trunk pan to the new one, and took note of all the braces, mounting brackets, and anything attached to the old trunk floor, like these shock-absorber mounts and the driveshaft bumper (not shown). Anything not on the new piece will need to be removed from the old trunk pan and reinstalled. We marked these areas so they were not damaged when we removed the old floor.
4. Using a Hypertherm Powermax45 plasma-cutting system, we cut the trunk in sections. First we drew the rough cut’s lines, using a piece of angle steel as a straight edge. Using this straight edge to guide the torch helped us keep our hands steady and obtain a clean cut through the metal. On the top right of the photo you can see where the cut was done freehand and we had to go back and recut a few places. We saved all of these pieces in case we needed them for reference later on.">
<strong>3.</strong> We compared the old trunk pan to the new one, and took note of all the braces, mounting brackets, and anything attached to the old trunk floor, like these shock-absorber mounts and the driveshaft bumper (not shown). Anything not on the new piece will need to be removed from the old trunk pan and reinstalled. We marked these areas so they were not damaged when we removed the old floor.
4. Using a Hypertherm Powermax45 plasma-cutting system, we cut the trunk in sections. First we drew the rough cut’s lines, using a piece of angle steel as a straight edge. Using this straight edge to guide the torch helped us keep our hands steady and obtain a clean cut through the metal. On the top right of the photo you can see where the cut was done freehand and we had to go back and recut a few places. We saved all of these pieces in case we needed them for reference later on.">
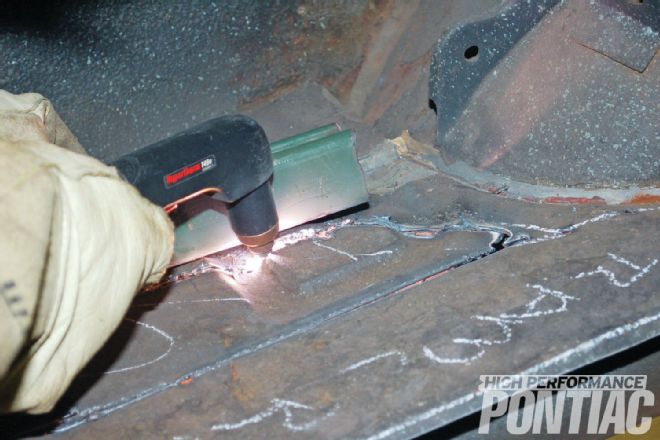 <strong>4.</strong> Using a Hypertherm Powermax45 plasma-cutting system, we cut the trunk in sections. First we drew the rough cut’s lines, using a piece of angle steel as a straight edge. Using this straight edge to guide the torch helped us keep our hands steady and obtain a clean cut through the metal. On the top right of the photo you can see where the cut was done freehand and we had to go back and recut a few places. We saved all of these pieces in case we needed them for reference later on.
5. It’s good advice to watch for the level and alignment of the framerails. This can be measured using a level from the framerail to the quarter-panel dropdown. The framerails might want to pull up once the taillight panel or quarter panel is cut away.">
<strong>4.</strong> Using a Hypertherm Powermax45 plasma-cutting system, we cut the trunk in sections. First we drew the rough cut’s lines, using a piece of angle steel as a straight edge. Using this straight edge to guide the torch helped us keep our hands steady and obtain a clean cut through the metal. On the top right of the photo you can see where the cut was done freehand and we had to go back and recut a few places. We saved all of these pieces in case we needed them for reference later on.
5. It’s good advice to watch for the level and alignment of the framerails. This can be measured using a level from the framerail to the quarter-panel dropdown. The framerails might want to pull up once the taillight panel or quarter panel is cut away.">
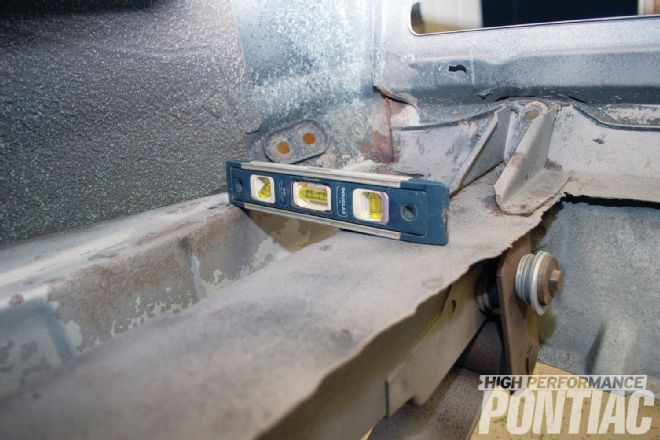 <strong>5.</strong> It’s good advice to watch for the level and alignment of the framerails. This can be measured using a level from the framerail to the quarter-panel dropdown. The framerails might want to pull up once the taillight panel or quarter panel is cut away.
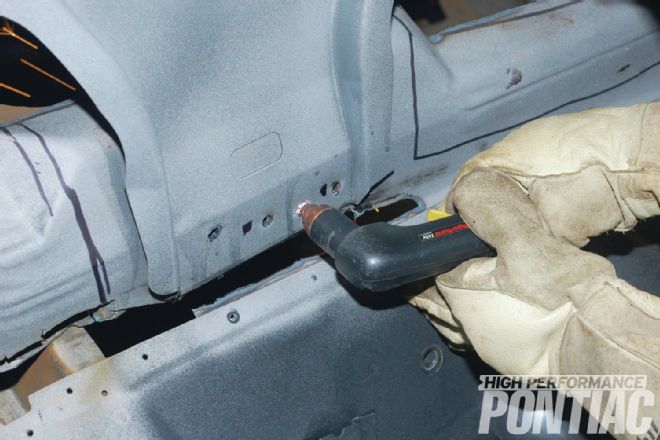
6. We used a ball-pein hammer to bend up the old trunk-floor layer along the framerails. This helped to create space around the spot-weld under the layer. This way, the plasma torch, spot-weld cutter, or grinder could get through the trunk-pan layer and was less inclined to affect the framerail.">
<strong>5.</strong> It’s good advice to watch for the level and alignment of the framerails. This can be measured using a level from the framerail to the quarter-panel dropdown. The framerails might want to pull up once the taillight panel or quarter panel is cut away.
6. We used a ball-pein hammer to bend up the old trunk-floor layer along the framerails. This helped to create space around the spot-weld under the layer. This way, the plasma torch, spot-weld cutter, or grinder could get through the trunk-pan layer and was less inclined to affect the framerail.">
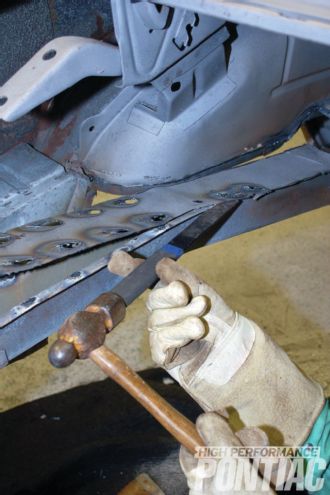
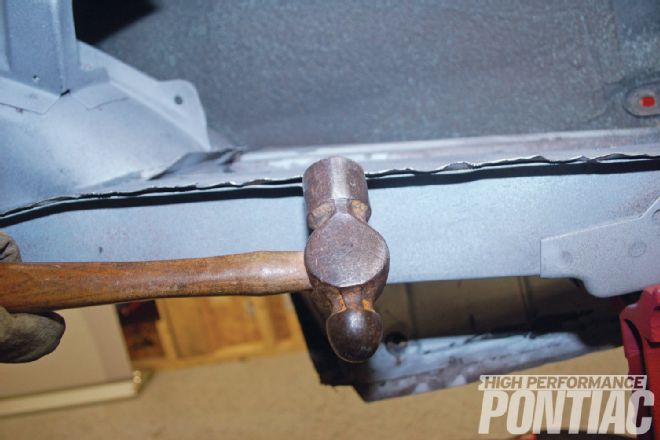 <strong>6.</strong> We used a ball-pein hammer to bend up the old trunk-floor layer along the framerails. This helped to create space around the spot-weld under the layer. This way, the plasma torch, spot-weld cutter, or grinder could get through the trunk-pan layer and was less inclined to affect the framerail.
7. Sometimes you don’t remember or can’t see the location of the spot-welds. To help, we marked them with a black marker.">
<strong>6.</strong> We used a ball-pein hammer to bend up the old trunk-floor layer along the framerails. This helped to create space around the spot-weld under the layer. This way, the plasma torch, spot-weld cutter, or grinder could get through the trunk-pan layer and was less inclined to affect the framerail.
7. Sometimes you don’t remember or can’t see the location of the spot-welds. To help, we marked them with a black marker.">
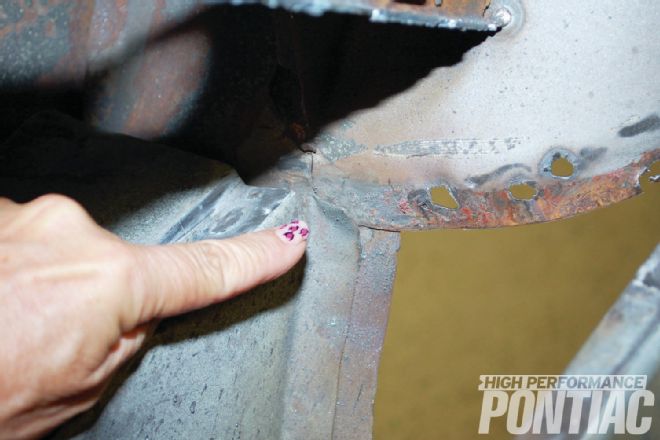
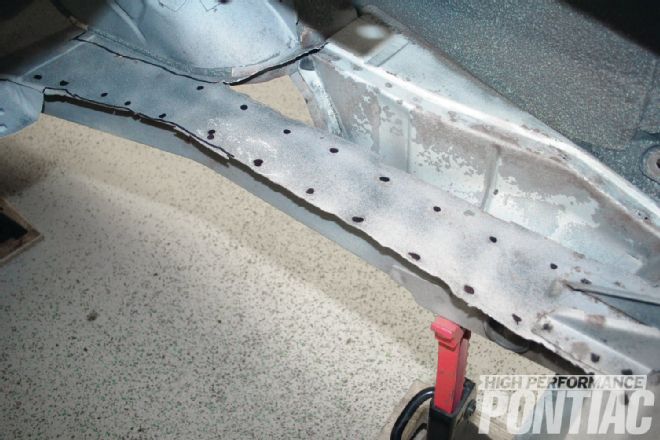 <strong>7.</strong> Sometimes you don’t remember or can’t see the location of the spot-welds. To help, we marked them with a black marker.
8. We used the Gouge setting on Hypertherm’s Powermax45 to remove the spot-welds, which does the job much faster than traditional methods, such as spot-weld cutters or grinding. It takes a good deal of practice with plasma to successfully use this cutting method. (Hypertherm recommended we practice on the old trunk pan and get comfortable with the technique before trying it on the rest of the vehicle.) We held the Powermax45 torch at a sharp angle to the surface, and gouged off the top layer of the metal over and around the spot-welds on the framerail using a feathering movement with the torch. (If using spot-weld-cutter drill bits, buy extra, especially when doing a job with this many spot-welds.) ">
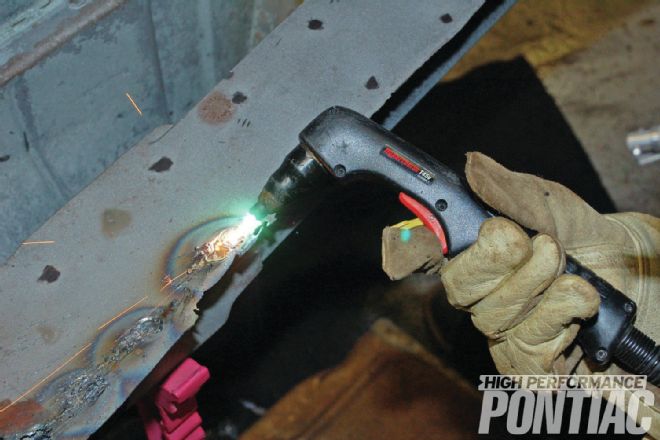
<strong>8.</strong> We used the Gouge setting on Hypertherm’s Powermax45 to remove the spot-welds, which does the job much faster than traditional methods, such as spot-weld cutters or grinding. It takes a good deal of practice with plasma to successfully use this cutting method. (Hypertherm recommended we practice on the old trunk pan and get comfortable with the technique before trying it on the rest of the vehicle.) We held the Powermax45 torch at a sharp angle to the surface, and gouged off the top layer of the metal over and around the spot-welds on the framerail using a feathering movement with the torch. (If using spot-weld-cutter drill bits, buy extra, especially when doing a job with this many spot-welds.)
9. Next, we used a Steck Seambuster and hammer to separate the spot-weld ribbon from the framerails, and repeated this process on the rest of the spot-welds. We used a hammer and dolly to smooth out any rough areas in the framerails, inner wheelhouse, and wherever else needed.">
<strong>7.</strong> Sometimes you don’t remember or can’t see the location of the spot-welds. To help, we marked them with a black marker.
8. We used the Gouge setting on Hypertherm’s Powermax45 to remove the spot-welds, which does the job much faster than traditional methods, such as spot-weld cutters or grinding. It takes a good deal of practice with plasma to successfully use this cutting method. (Hypertherm recommended we practice on the old trunk pan and get comfortable with the technique before trying it on the rest of the vehicle.) We held the Powermax45 torch at a sharp angle to the surface, and gouged off the top layer of the metal over and around the spot-welds on the framerail using a feathering movement with the torch. (If using spot-weld-cutter drill bits, buy extra, especially when doing a job with this many spot-welds.) ">
<strong>8.</strong> We used the Gouge setting on Hypertherm’s Powermax45 to remove the spot-welds, which does the job much faster than traditional methods, such as spot-weld cutters or grinding. It takes a good deal of practice with plasma to successfully use this cutting method. (Hypertherm recommended we practice on the old trunk pan and get comfortable with the technique before trying it on the rest of the vehicle.) We held the Powermax45 torch at a sharp angle to the surface, and gouged off the top layer of the metal over and around the spot-welds on the framerail using a feathering movement with the torch. (If using spot-weld-cutter drill bits, buy extra, especially when doing a job with this many spot-welds.)
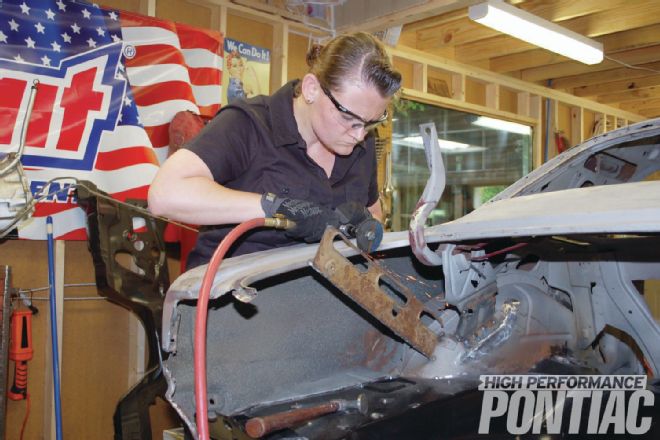
9. Next, we used a Steck Seambuster and hammer to separate the spot-weld ribbon from the framerails, and repeated this process on the rest of the spot-welds. We used a hammer and dolly to smooth out any rough areas in the framerails, inner wheelhouse, and wherever else needed.">
 <strong>9.</strong> Next, we used a Steck Seambuster and hammer to separate the spot-weld ribbon from the framerails, and repeated this process on the rest of the spot-welds. We used a hammer and dolly to smooth out any rough areas in the framerails, inner wheelhouse, and wherever else needed.
10. There was interior bracing left in the Firebird from our floorpan install, but just to be safe, we tack-welded in two more braces between the inner wheelhouse and the edge of the trunk jam. This helped keep the quarter panels aligned after the taillight panel was removed.">
<strong>9.</strong> Next, we used a Steck Seambuster and hammer to separate the spot-weld ribbon from the framerails, and repeated this process on the rest of the spot-welds. We used a hammer and dolly to smooth out any rough areas in the framerails, inner wheelhouse, and wherever else needed.
10. There was interior bracing left in the Firebird from our floorpan install, but just to be safe, we tack-welded in two more braces between the inner wheelhouse and the edge of the trunk jam. This helped keep the quarter panels aligned after the taillight panel was removed.">
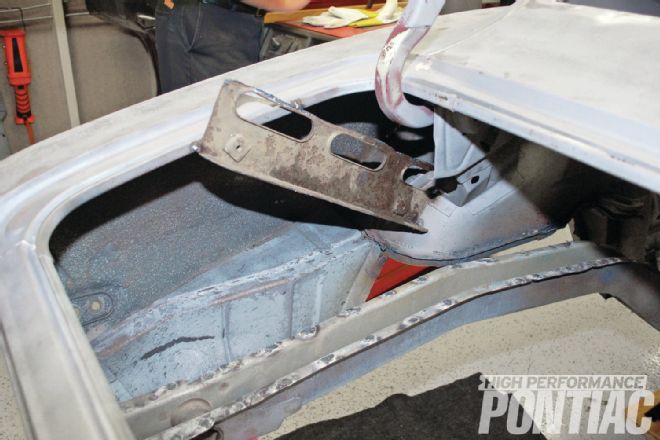 <strong>10.</strong> There was interior bracing left in the Firebird from our floorpan install, but just to be safe, we tack-welded in two more braces between the inner wheelhouse and the edge of the trunk jam. This helped keep the quarter panels aligned after the taillight panel was removed.
11. Using a spot-weld drill bit, we drilled out the spot-welds attaching the back flip of the trunk pan and the inner valance, taking care not to go through the second layer. We left the inner valance in place. This helped keep the framerails from moving too much after the floor was cut.">
<strong>10.</strong> There was interior bracing left in the Firebird from our floorpan install, but just to be safe, we tack-welded in two more braces between the inner wheelhouse and the edge of the trunk jam. This helped keep the quarter panels aligned after the taillight panel was removed.
11. Using a spot-weld drill bit, we drilled out the spot-welds attaching the back flip of the trunk pan and the inner valance, taking care not to go through the second layer. We left the inner valance in place. This helped keep the framerails from moving too much after the floor was cut.">
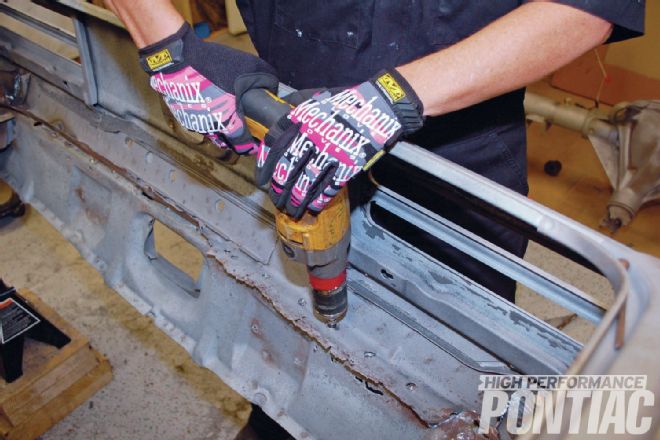 <strong>11.</strong> Using a spot-weld drill bit, we drilled out the spot-welds attaching the back flip of the trunk pan and the inner valance, taking care not to go through the second layer. We left the inner valance in place. This helped keep the framerails from moving too much after the floor was cut.
12. A five-in-one tool and a hammer worked effectively for digging out the nearly 50-year-old rock-hard sealer.">
<strong>11.</strong> Using a spot-weld drill bit, we drilled out the spot-welds attaching the back flip of the trunk pan and the inner valance, taking care not to go through the second layer. We left the inner valance in place. This helped keep the framerails from moving too much after the floor was cut.
12. A five-in-one tool and a hammer worked effectively for digging out the nearly 50-year-old rock-hard sealer.">
 <strong>12.</strong> A five-in-one tool and a hammer worked effectively for digging out the nearly 50-year-old rock-hard sealer.
13. Using the plasma system, we pierced the spot-welds of the back-seat supports. This method was also used on the welds that connect the trunk pan to the inner wheelhouse. The black lines on the trunk pan show how we will cut the metal around the supports. It’s very easy to mistakenly cut through things not meant to be cut!">
<strong>12.</strong> A five-in-one tool and a hammer worked effectively for digging out the nearly 50-year-old rock-hard sealer.
13. Using the plasma system, we pierced the spot-welds of the back-seat supports. This method was also used on the welds that connect the trunk pan to the inner wheelhouse. The black lines on the trunk pan show how we will cut the metal around the supports. It’s very easy to mistakenly cut through things not meant to be cut!">
 <strong>13.</strong> Using the plasma system, we pierced the spot-welds of the back-seat supports. This method was also used on the welds that connect the trunk pan to the inner wheelhouse. The black lines on the trunk pan show how we will cut the metal around the supports. It’s very easy to mistakenly cut through things not meant to be cut!
14. The trunk floor’s front structure is actually two chambers created by three different layers of metal. We cut one layer at a time away with the plasma cutter.">
<strong>13.</strong> Using the plasma system, we pierced the spot-welds of the back-seat supports. This method was also used on the welds that connect the trunk pan to the inner wheelhouse. The black lines on the trunk pan show how we will cut the metal around the supports. It’s very easy to mistakenly cut through things not meant to be cut!
14. The trunk floor’s front structure is actually two chambers created by three different layers of metal. We cut one layer at a time away with the plasma cutter.">
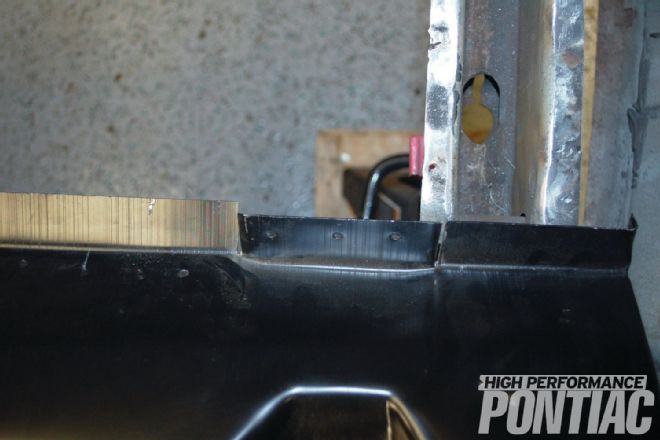
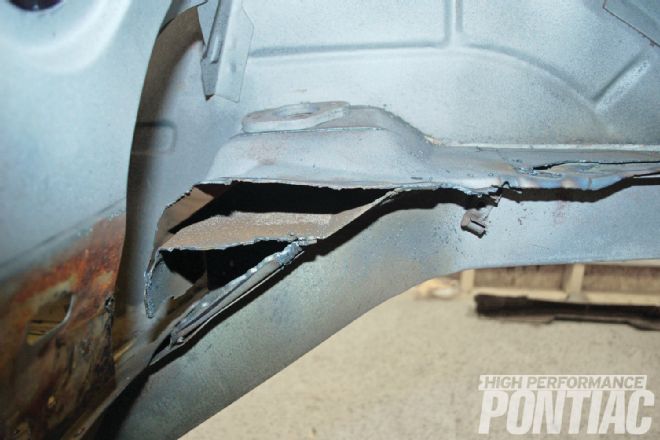 <strong>14.</strong> The trunk floor’s front structure is actually two chambers created by three different layers of metal. We cut one layer at a time away with the plasma cutter.
Conclusion
Most restoration projects are learning experiences, and we learned a great deal with this install. Admittedly, the trunk pan doesn’t get noticed often. Nonetheless, it plays a critical role in the structural integrity of our Firebird, in that it’s a keystone piece that holds together and supports the back end of the car.
Editor’s Note: JoAnn Bortles is an award-winning custom painter, airbrush artist, and book author with over 30 years of experience in the automotive industry. Her work has been featured in Street Rodder, Hot Rod Milestones, Hot Rod, and other automotive publications.
15. We ground the spot-weld areas smooth, using a right-angle grinder with an 80-grit sanding disc.">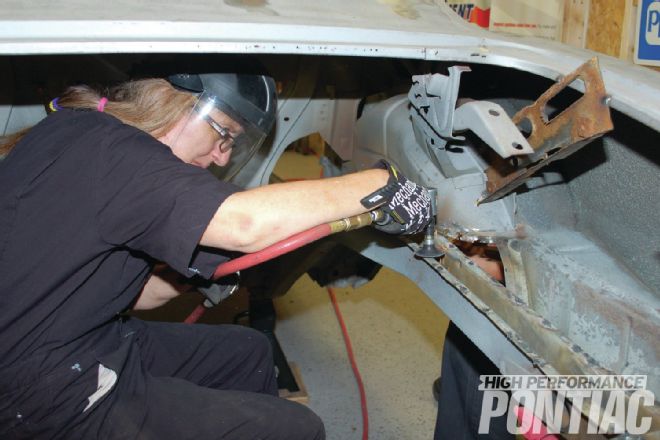 <strong>15.</strong> We ground the spot-weld areas smooth, using a right-angle grinder with an 80-grit sanding disc.
16. Woohoo! The trunk pan is now completely removed. We repeated the process of cut, removing spot-welds, seam busting, and grinding on the taillight panel.">
<strong>15.</strong> We ground the spot-weld areas smooth, using a right-angle grinder with an 80-grit sanding disc.
16. Woohoo! The trunk pan is now completely removed. We repeated the process of cut, removing spot-welds, seam busting, and grinding on the taillight panel.">
 <strong>16.</strong> Woohoo! The trunk pan is now completely removed. We repeated the process of cut, removing spot-welds, seam busting, and grinding on the taillight panel.
17. There are two ways to fit a full trunk pan into the vehicle. More common is when the quarter panel and both inner and outer wheelhouses are being replaced. Once those have been removed from the vehicle, the trunk pan can be slid into place through the side. As we were not replacing the inner wheelhouses, we opted for removing the taillight panel and cutting 1-inch-wide notches into one or both of the ends on the quarter panels. The bottom middle section of both of the trunk-hinge mounts needed to be removed. We left the sides of the mount in place, so the dimension was less inclined to change. We sliced the section away at the top and bottom with a cut-off wheel. (This mount can also be completely removed by drilling out the spot-welds.) We then sliced along the 10-inch straight line stamped into the inner-wheelhouse area immediately below the hinge mount, and hammered it outward using a body hammer. The cut lines are noted with orange in this photo.">
<strong>16.</strong> Woohoo! The trunk pan is now completely removed. We repeated the process of cut, removing spot-welds, seam busting, and grinding on the taillight panel.
17. There are two ways to fit a full trunk pan into the vehicle. More common is when the quarter panel and both inner and outer wheelhouses are being replaced. Once those have been removed from the vehicle, the trunk pan can be slid into place through the side. As we were not replacing the inner wheelhouses, we opted for removing the taillight panel and cutting 1-inch-wide notches into one or both of the ends on the quarter panels. The bottom middle section of both of the trunk-hinge mounts needed to be removed. We left the sides of the mount in place, so the dimension was less inclined to change. We sliced the section away at the top and bottom with a cut-off wheel. (This mount can also be completely removed by drilling out the spot-welds.) We then sliced along the 10-inch straight line stamped into the inner-wheelhouse area immediately below the hinge mount, and hammered it outward using a body hammer. The cut lines are noted with orange in this photo.">
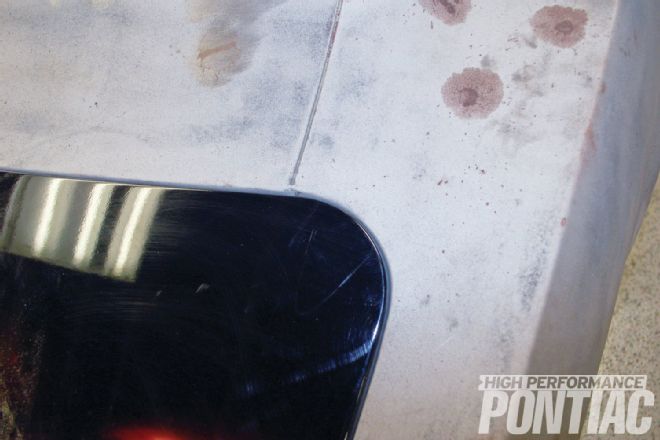
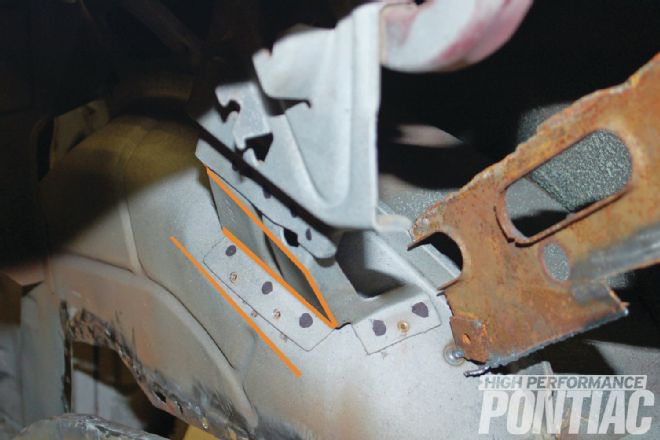 <strong>17.</strong> There are two ways to fit a full trunk pan into the vehicle. More common is when the quarter panel and both inner and outer wheelhouses are being replaced. Once those have been removed from the vehicle, the trunk pan can be slid into place through the side. As we were not replacing the inner wheelhouses, we opted for removing the taillight panel and cutting 1-inch-wide notches into one or both of the ends on the quarter panels. The bottom middle section of both of the trunk-hinge mounts needed to be removed. We left the sides of the mount in place, so the dimension was less inclined to change. We sliced the section away at the top and bottom with a cut-off wheel. (This mount can also be completely removed by drilling out the spot-welds.) We then sliced along the 10-inch straight line stamped into the inner-wheelhouse area immediately below the hinge mount, and hammered it outward using a body hammer. The cut lines are noted with orange in this photo.
18. To help with clearance, we notched the front lip of the trunk pan and bent it up. After the pan was in place, we bent it back into position.">
<strong>18.</strong> To help with clearance, we notched the front lip of the trunk pan and bent it up. After the pan was in place, we bent it back into position.
19. For the test-fit, Terry held one side, while this author handled the other. Jasen guided the trunk pan from the interior. The trunk pan fit in through the rear of the car. It sat pretty flush on the framerails, but a few places needed a little more work. Every vehicle is different, and there will be places on the vehicle where the new pan will need some massaging or notching in order to fit. ">
<strong>17.</strong> There are two ways to fit a full trunk pan into the vehicle. More common is when the quarter panel and both inner and outer wheelhouses are being replaced. Once those have been removed from the vehicle, the trunk pan can be slid into place through the side. As we were not replacing the inner wheelhouses, we opted for removing the taillight panel and cutting 1-inch-wide notches into one or both of the ends on the quarter panels. The bottom middle section of both of the trunk-hinge mounts needed to be removed. We left the sides of the mount in place, so the dimension was less inclined to change. We sliced the section away at the top and bottom with a cut-off wheel. (This mount can also be completely removed by drilling out the spot-welds.) We then sliced along the 10-inch straight line stamped into the inner-wheelhouse area immediately below the hinge mount, and hammered it outward using a body hammer. The cut lines are noted with orange in this photo.
18. To help with clearance, we notched the front lip of the trunk pan and bent it up. After the pan was in place, we bent it back into position.">
<strong>18.</strong> To help with clearance, we notched the front lip of the trunk pan and bent it up. After the pan was in place, we bent it back into position.
19. For the test-fit, Terry held one side, while this author handled the other. Jasen guided the trunk pan from the interior. The trunk pan fit in through the rear of the car. It sat pretty flush on the framerails, but a few places needed a little more work. Every vehicle is different, and there will be places on the vehicle where the new pan will need some massaging or notching in order to fit. ">
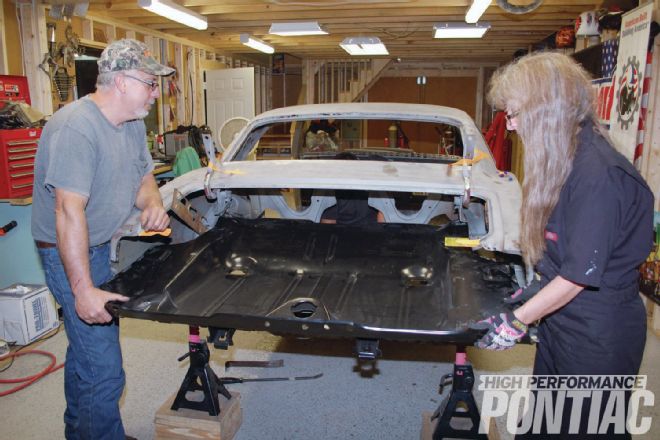 <strong>19.</strong> For the test-fit, Terry held one side, while this author handled the other. Jasen guided the trunk pan from the interior. The trunk pan fit in through the rear of the car. It sat pretty flush on the framerails, but a few places needed a little more work. Every vehicle is different, and there will be places on the vehicle where the new pan will need some massaging or notching in order to fit.
20. We scribed around the frame-rails using an awl, and then removed the pan from the trunk.">
<strong>19.</strong> For the test-fit, Terry held one side, while this author handled the other. Jasen guided the trunk pan from the interior. The trunk pan fit in through the rear of the car. It sat pretty flush on the framerails, but a few places needed a little more work. Every vehicle is different, and there will be places on the vehicle where the new pan will need some massaging or notching in order to fit.
20. We scribed around the frame-rails using an awl, and then removed the pan from the trunk.">
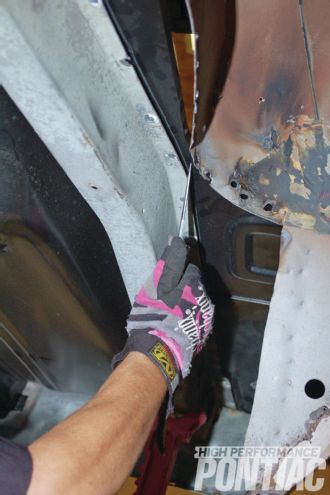 <strong>20.</strong> We scribed around the frame-rails using an awl, and then removed the pan from the trunk.
21. Jasen drilled 1⁄4-inch holes for the plug weld around the perimeter and over the framerail areas of the new trunk. We ran 1⁄4-inch 3M masking tape next to the scribed line. He drew a line down the middle of the tape, and using a spreader as a measuring reference, he marked and drilled each hole. Next, we welded any brackets or mounts removed from the old trunk pan onto the new one.">
<strong>20.</strong> We scribed around the frame-rails using an awl, and then removed the pan from the trunk.
21. Jasen drilled 1⁄4-inch holes for the plug weld around the perimeter and over the framerail areas of the new trunk. We ran 1⁄4-inch 3M masking tape next to the scribed line. He drew a line down the middle of the tape, and using a spreader as a measuring reference, he marked and drilled each hole. Next, we welded any brackets or mounts removed from the old trunk pan onto the new one.">
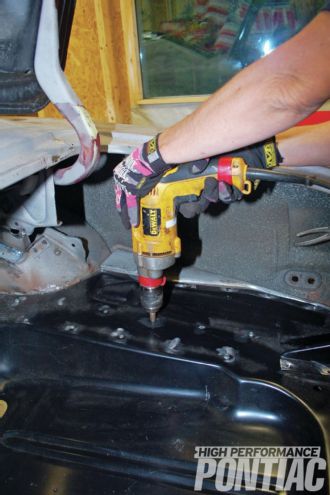
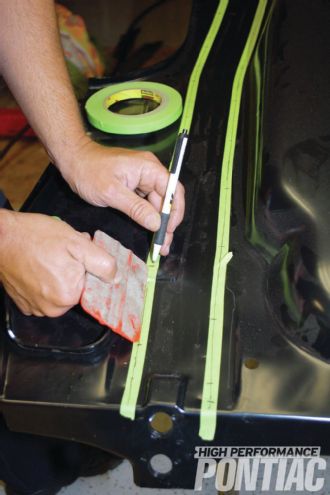 <strong>21.</strong> Jasen drilled 1⁄4-inch holes for the plug weld around the perimeter and over the framerail areas of the new trunk. We ran 1⁄4-inch 3M masking tape next to the scribed line. He drew a line down the middle of the tape, and using a spreader as a measuring reference, he marked and drilled each hole. Next, we welded any brackets or mounts removed from the old trunk pan onto the new one.
22. We installed the trunk for the last time. The front lip was inserted under the back edge of the floorpan. We fitted the tight areas by notching, nipping, and or hammering. For example, this small tab shown here was nipped off.">
<strong>21.</strong> Jasen drilled 1⁄4-inch holes for the plug weld around the perimeter and over the framerail areas of the new trunk. We ran 1⁄4-inch 3M masking tape next to the scribed line. He drew a line down the middle of the tape, and using a spreader as a measuring reference, he marked and drilled each hole. Next, we welded any brackets or mounts removed from the old trunk pan onto the new one.
22. We installed the trunk for the last time. The front lip was inserted under the back edge of the floorpan. We fitted the tight areas by notching, nipping, and or hammering. For example, this small tab shown here was nipped off.">
 <strong>22.</strong> We installed the trunk for the last time. The front lip was inserted under the back edge of the floorpan. We fitted the tight areas by notching, nipping, and or hammering. For example, this small tab shown here was nipped off.
23. We used #8 Tek screws and clamps to hold the trunk pan in place. The Tek screws keep the floor flush against the framerails and floorpan. We also used clamps and #8 Tek screws around the edges of the pan.">
<strong>22.</strong> We installed the trunk for the last time. The front lip was inserted under the back edge of the floorpan. We fitted the tight areas by notching, nipping, and or hammering. For example, this small tab shown here was nipped off.
23. We used #8 Tek screws and clamps to hold the trunk pan in place. The Tek screws keep the floor flush against the framerails and floorpan. We also used clamps and #8 Tek screws around the edges of the pan.">
 <strong>23.</strong> We used #8 Tek screws and clamps to hold the trunk pan in place. The Tek screws keep the floor flush against the framerails and floorpan. We also used clamps and #8 Tek screws around the edges of the pan.
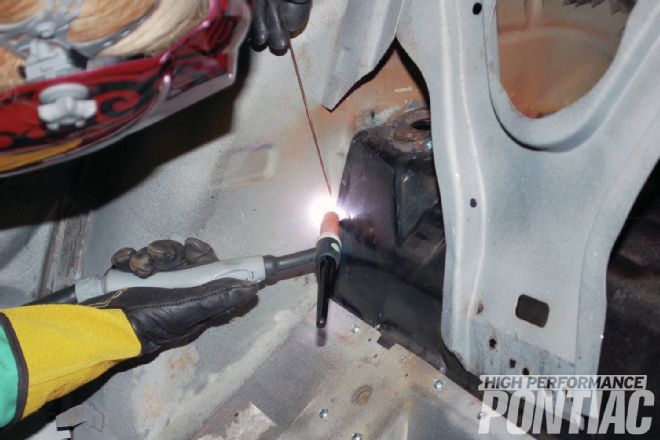
24. Using a Miller Diversion 180 TIG Welder, we welded the trunk-lid hinge mounts back into place. Jasen used a body hammer to put the wheelhouses back into their original shape and welded them up on both sides.">
<strong>23.</strong> We used #8 Tek screws and clamps to hold the trunk pan in place. The Tek screws keep the floor flush against the framerails and floorpan. We also used clamps and #8 Tek screws around the edges of the pan.
24. Using a Miller Diversion 180 TIG Welder, we welded the trunk-lid hinge mounts back into place. Jasen used a body hammer to put the wheelhouses back into their original shape and welded them up on both sides.">
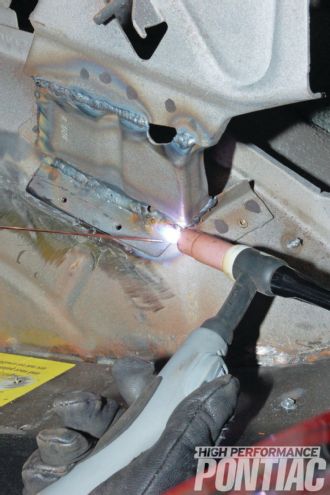 <strong>24.</strong> Using a Miller Diversion 180 TIG Welder, we welded the trunk-lid hinge mounts back into place. Jasen used a body hammer to put the wheelhouses back into their original shape and welded them up on both sides.
25. We ground and smoothed the welds on the hinge mounts and wheelhouses with a right-angle grinder and a 3M 80-grit sanding disc.">
<strong>24.</strong> Using a Miller Diversion 180 TIG Welder, we welded the trunk-lid hinge mounts back into place. Jasen used a body hammer to put the wheelhouses back into their original shape and welded them up on both sides.
25. We ground and smoothed the welds on the hinge mounts and wheelhouses with a right-angle grinder and a 3M 80-grit sanding disc.">
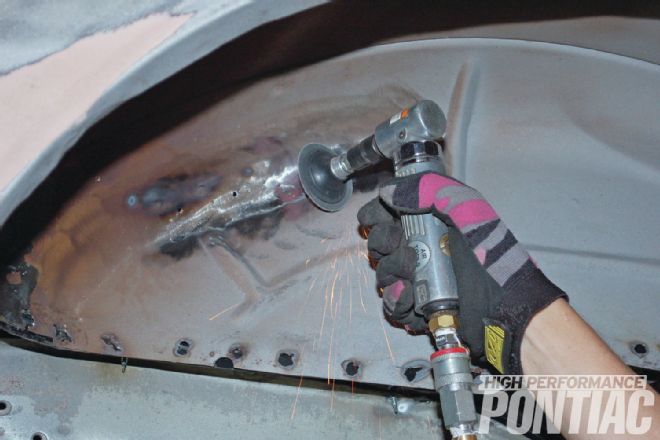 <strong>25.</strong> We ground and smoothed the welds on the hinge mounts and wheelhouses with a right-angle grinder and a 3M 80-grit sanding disc.
26. Jennifer removed the extra braces on the trunk. Then Jasen and she reinstalled the trunk lid. We checked the gaps and measurements taken earlier, and found they did not change. (Remember, that’s why we added the braces!)">
<strong>26.</strong> Jennifer removed the extra braces on the trunk. Then Jasen and she reinstalled the trunk lid. We checked the gaps and measurements taken earlier, and found they did not change. (Remember, that’s why we added the braces!)
27. We tack-welded the front of the trunk pan at both corners and in the middle, and then tacked the trunk pan to the inner wheelhouses. The flip-up area on the back edge of the trunk pan was bent back to align with the taillight panel.">
<strong>25.</strong> We ground and smoothed the welds on the hinge mounts and wheelhouses with a right-angle grinder and a 3M 80-grit sanding disc.
26. Jennifer removed the extra braces on the trunk. Then Jasen and she reinstalled the trunk lid. We checked the gaps and measurements taken earlier, and found they did not change. (Remember, that’s why we added the braces!)">
<strong>26.</strong> Jennifer removed the extra braces on the trunk. Then Jasen and she reinstalled the trunk lid. We checked the gaps and measurements taken earlier, and found they did not change. (Remember, that’s why we added the braces!)
27. We tack-welded the front of the trunk pan at both corners and in the middle, and then tacked the trunk pan to the inner wheelhouses. The flip-up area on the back edge of the trunk pan was bent back to align with the taillight panel.">
 <strong>27.</strong> We tack-welded the front of the trunk pan at both corners and in the middle, and then tacked the trunk pan to the inner wheelhouses. The flip-up area on the back edge of the trunk pan was bent back to align with the taillight panel.
28. Here’s the trunk pan installed. The total time for this install was two days, not counting the day we spent figuring out our plan of attack. The new quarters can now be replaced, and the test-fitted taillight panel can be welded. ">
<strong>27.</strong> We tack-welded the front of the trunk pan at both corners and in the middle, and then tacked the trunk pan to the inner wheelhouses. The flip-up area on the back edge of the trunk pan was bent back to align with the taillight panel.
28. Here’s the trunk pan installed. The total time for this install was two days, not counting the day we spent figuring out our plan of attack. The new quarters can now be replaced, and the test-fitted taillight panel can be welded. ">
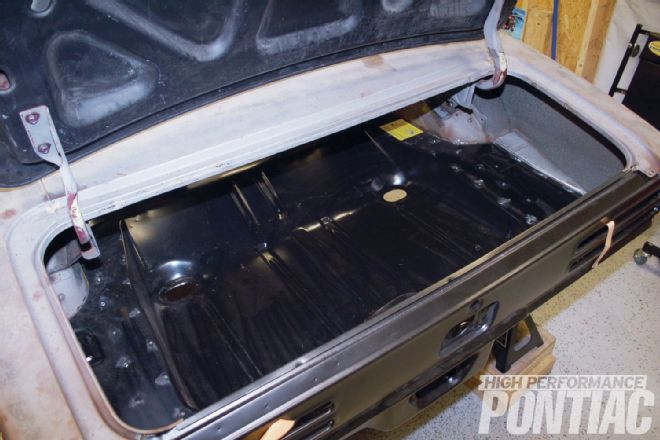 <strong>28.</strong> Here’s the trunk pan installed. The total time for this install was two days, not counting the day we spent figuring out our plan of attack. The new quarters can now be replaced, and the test-fitted taillight panel can be welded.